


English
37
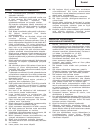
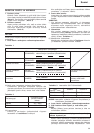
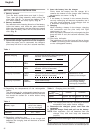
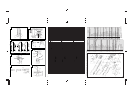
Lights for 0.5 seconds. Does not light for 0.5
seconds. (off for 0.5 seconds)
Lights continuously
Lights for 0.5 seconds. Does not light for 0.5
seconds. (off for 0.5 seconds)
Lights for 0.1 seconds. Does not light for 0.1
seconds. (off for 0.1 seconds)
Lights continuously
Before charging
While charging
Charging complete
Charging impossible
Charging impossible
Blinks
(RED)
Lights
(RED)
Blinks
(RED)
Flikers
(RED)
Lights
(GREEN)
Malfunction in the
battery or the charger
The battery tempera-
ture is high, making
recharging impossible.
Table 1
Indications of the pilot lamp
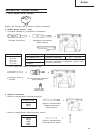
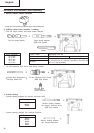
BATTERY REMOVAL/INSTALLATION
1. Battery removal
Turn the body upside down and hold it firmly.
Then, open the plate assembly while pulling the
slide lever. (Fig. 2) To remove the battery, pull it
out while holding the body tightly. (Fig. 3)
2. Battery installation
Pay attention to the inserting direction of the battery,
insert the battery, and close the plate assembly.
When the plate assembly and the slide lever engage
each other perfectly, there will be the sound of a
click. (Fig. 4)
CHARGING
Before using the power tool, charge the battery as follows.
1. Connect the charger’s power cord to the receptacle.
When the power cord is connected, the charger’s
pilot lamp will blink in red. (At 1-second intervals.)
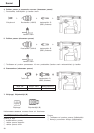
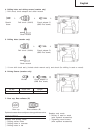
2. Insert the battery into the charger.
Firmly insert the battery into the charger till it
contacts the bottom of the charger after checking
the polarities as shown in Fig. 5.
CAUTION:
⅜ If the battery is inserted in the reverse direction,
not only recharging will become impossible, but it
may also cause problems in the charger such as
a deformed recharging terminal.
3. Charging
When inserting a battery in the charger, charging
will commence and the pilot lamp will light
continuously in red.
When the battery becomes fully recharged, the pilot
lamp will blink in red. (At 1-second intervals.) (See
Table 1)
(1) Pilot lamp indication
The indications of the pilot lamp will be as shown
in Table 1, according to the condition of the charger
or the rechargeable battery.
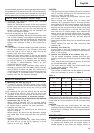
(2) Regarding the temperatures of the rechargeable
battery
The temperatures for rechargeable batteries are as
shown in the table 2, and batteries that have become
hot should be cooled for a while before being
recharged.
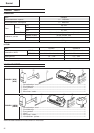
Table 2
(3) Regarding recharging time
Depending on the combination of the charger and
batteries, the charging time will become as shown
in Table 3.
Table 3 Charging time (At 20°C)
NOTE: The charging time may vary according to ambient
temperature and power source voltage.
4. Disconnect the charger’s power cord from the
receptacle.
5. Hold the charger firmly and pull out the battery.
NOTE: After operation, pull out batteries from the
charger first, and then keep the batteries
properly.
Regarding electric discharge in case of new batteries,
etc.
As the internal chemical substance of new batteries and
batteries that have not been used for an extended period
Temperatures at
Battery type which the battery
can be recharged
EB24B –5°C – 60°C
EB2430H 0°C – 45°C
Charger
Battery
UC24YF UC24YFA
EB24B Approx. 60 min. Approx. 50 min.
EB2430H Approx. 90 min. Approx. 70 min.