


English
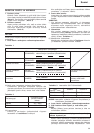
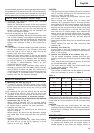
38
Bit dia. (mm) Depth (mm)
Possible continuous
drilling number (holes)
6.5 30 75
8.5 30 64
12.5 35 42
14.5 45 29
18 40 26
is not activated, the electric discharge might be low when
using them the first and second time. This is a temporary
phenomenon, and normal time required for recharging
will be restored by recharging the batteries 2–3 times.
How to make the batteries perform longer
(1) Recharge the batteries before they become
completely exhausted.
When you feel that the power of the tool becomes
weaker, stop using the tool and recharge its battery.
If you continue to use the tool and exhaust the
electric current, the battery may be damaged and
its life will become shorter.
(2) Avoid recharging at high temperatures.
A rechargeable battery will be hot immediately after
use. If such a battery is recharged immediately after
use, its internal chemical substance will deteriorate,
and the battery life will be shortened. Leave the
battery and recharge it after it has cooled for a
while.
CAUTIONS:
⅜ If the battery has been heated right after operation
(or due to sunlight, etc.), the charger’s pilot lamp
may not light in red. In such a case, first let the
battery cool, then start charging.
⅜ When the pilot lamp flikers in red (at 0.2–second
intervals), check for and take out any foreign objects
in the charger’s battery installation hole. If there are
no foreign objects, it is probable that the battery
or charger is malfunctioning. Take it to your
authorized Service Center.
⅜ Since the built-in micro computer takes about 3
seconds to confirm that the battery being charged
with UC24YFA is taken out, wait for a minimum of
3 seconds before reinserting it to continue charging.
If the battery is reinserted within 3 seconds, the
battery may not be properly charged.
PRIOR TO OPERATION
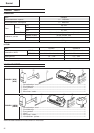
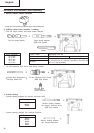
1. Mounting the drill bit (Fig. 6)
(1) To attach a drill bit (SDS-plus shank), fully pull the
grip in the direction of the arrow as shown in Fig.
6 and insert the drill bit as far as it will go while
rotating.
(2) By releasing the grip, the drill bit will be secured.
(3) To remove the drill bit, fully pull the grip in the
direction of the arrow and pull out the drill bit.
2. Confirm that the battery is mounted correctly.
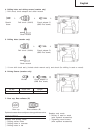
3. Installation of dust cup or dust collector (B) (Optional
accessories) (Fig. 8, Fig. 9)
When using a hammer drill for upward drilling
operations, attach a dust cup or a dust collector (B)
to collect dust or particles for easy operation.
⅜ Installing the dust cup
Use the dust cup by attaching to the drill bit as
shown in Fig. 8.
When using a bit which has big diameter, enlarge
the center hole of the dust cup with this hammer
drill.
⅜ Installing dust collector (B)
When using dust collector (B), insert dust collector
(B) from the tip of the bit by aligning it to the
groove on the grip. (Fig. 9)
CAUTION:
⅜ The dust cup and dust collector (B) are for exclusive
use of concrete drilling work. Do not use them for
wood or metal drilling work.
⅜ Insert dust collector (B) completely into the chuck
part of the main unit.
⅜ When turning the hammer drill on while dust
collector (B) is detached from a concrete surface,
dust collector (B) will rotate together with the drill
bit. Make sure to turn on the switch after pressing
dust cup on the concrete surface. (When using dust
collector (B) attached to a drill bit that has more
than 190 mm of overall length, dust collector (B)
cannot touch the concrete surface and will rotate.
Therefore, please use dust collector (B) by attaching
to drill bits which have 166 mm, 160 mm, and 110
mm overall length.)
⅜ Dump particles after every two or three holes when
drilling.
⅜ Please replace the drill bit after removing dust
collector (B).
4. Selecting the driver bit
Screw heads or bits will be damaged unless a bit
appropriate for the screw diameter is employed to
drive in the screws.
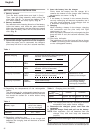
5. Confirm the direction of bit rotation (Fig. 11)
The bit rotates clockwise (viewed from the rear
side) by pushing the R-side of the push button. (Fig.
11-a)
The L-side of the push button is pushed to turn the
bit counterclockwise. (Fig. 11-b)
The motor does not rotate if the push button is set
to the center position. (Fig. 11-c)
6. Continuous drilling
The number of holes that can be drilled in concrete
after one recharge is shown in Table 4.
Table 4
These data are for the referential values. The number of
holes that can be drilled varies according to the sharpness
of the used bit or the conditions of the concrete being
drilled.
CAUTION:
⅜ When using this unit continuously, the unit may
overheat, leading to damage in the motor and switch.
Please leave it without using it for approximately
15 minutes.
HOW TO USE
1. Switch operation
The rotational speed of the drill bit can be controlled
by varying the amount that the trigger switch is
pulled. Speed is low when the trigger switch is