


English
39
pulled slightly and increases as the switch is pulled
more.
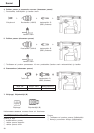
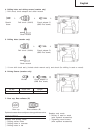
2. Rotation + Striking
Align the “
” mark with the “ ” mark by rotating
the change lever to set the “Rotation + Striking”
mode. (Fig. 10)
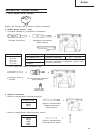
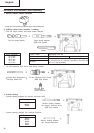
(1) Mount the drill bit.
(2) Pull the trigger switch after applying the drill bit
tip to the drilling position. (Fig. 7)
(3) Pushing the hammer drill forcibly is not necessary
at all. Pushing slightly so that drill dust comes out
gradually is just sufficient.
CAUTION:
When the drill bit touches construction iron bar, the
bit will stop immediately and the hammer drill will
react to revolve. Therefore please grip the side
handle and handle tightly as shown in Fig. 7.
3. Rotation only
Align the “
” mark with the “ ” mark by rotating
the change lever to set the “Rotation only” mode.
(Fig. 10)
To drill a wood or metal material using the optional
drill chuck and chuck adapter, proceed as follows.
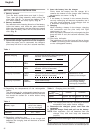
Installing drill chuck and chuck adapter: (Fig. 12)
(1) Attach the drill chuck to the chuck adaptor.
(2) The part of the SDS-plus shank is the same as the
drill bit. Therefore, refer to the item of “Mounting
the drill bit” for attaching it.
CAUTIONS:
⅜ Application of force more than necessary will not
only expedite work at all, but will deteriorate the
tip edge of the drill bit and reduce the service life
of the hammer drill in addition.
⅜ Drill bit may snap off while withdrawing the hammer
drill from the drilled hole. For withdrawing, it is
important to use a pushing motion.
⅜ Do not attempt to use the hammer drill in the
rotation and striking mode with the drill chuck and
chuck adapter attached. This would seriously shorten
the service life of every component of the machine.
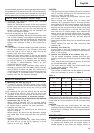
4. When driving wood screws (Fig. 14)
(1) Selecting a suitable driver bit
Employ plus-head screws, if possible, since the
driver bit easily slips off the heads of slotted-head
screws.
(2) Tightening wood screws
⅜ Prior to tightening wood screws, make pilot holes
suitable for them in the wooden board. Apply the
bit to the screw head grooves and gently drive the
screws in the holes.
CAUTION:
Exercise care in preparing a pilot hole suitable for
the wood screw taking the hardness of the wood
into consideration. Should the hole be excessively
small or shallow, requiring much power to drive
the screw into it, the thread of the wood screw may
sometimes be damaged.
5. Using depth gauge (Fig. 13)
(1) Loosen the knob on the side handle, and insert the
stopper into the mounting hole on the side handle.
(2) Adjust the depth gauge position according to the
depth of the hole and tighten the knob bolt securely.
6. How to use the drill bit (taper shank) and the taper
shank adapter
(1) Mount the taper shank adapter to the hammer drill.
(Fig. 15)
(2) Mount the drill bit (taper shank) to the taper shank
adapter. (Fig. 15)
(3) Turn the switch ON, and drill a hole to prescribed
depth.
(4) To remove the drill bit (taper shank), insert the
cotter into the slot of the taper shank adapter and
strike the head of the cotter with a hammer
supporting on the rest. (Fig. 16)
LUBRICATION
Low viscosity grease is applied to this hammer drill so
that it can be used for a long period without replacing the
grease. Please contact the nearest service center for
grease replacement when any grease is leaking form
loosened screw.
Further use of the hammer drill despite the grease shortage
causes damage to reduce the service life.
CAUTION:
A specific grease (FG-6A) is used with this machine,
therefore, the normal performance of the machine may
be badly affected by use of different grease. Please be
sure to let one of our service centers to undertake
replacement of the grease.
MAINTENANCE AND INSPECTION
1. Inspecting the tool
Since use of a dull tool will degrade efficiency and
cause possible motor malfunction, sharpen or
replace the tool as soon as abrasion is noted.
2. Inspecting the mounting screws
Regularly inspect all mounting screws and ensure
that they are properly tightened. Should any of the
screws be loose, retighten them immediately. Failure
to do so could result in serious hazard.
3. Cleaning on the outside
When the power tool is stained, wipe with a soft
dry cloth or a cloth moistened with soapy water.
Do not use chloric solvents, gasoline or paint thinner,
as they melt plastics.
4. Storage
Store the power tool in a place in which the
temperature is less than 40°C and out of reach of
children.
NOTE
Due to HITACHI’s continuing program of research and
development, the specifications herein are subject to
change without prior notice.
Information concerning airborne noise and vibration
The measured values were determined according to
EN50144.
The typical A-weighted sound pressure level: 92 dB (A)
The typical A-weighted sound power level: 105 dB (A)
Wear ear protection.
The typical weighted root mean square acceleration value:
8.0m/s
2