


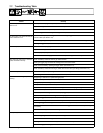

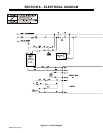

OM-228 187 Page 28
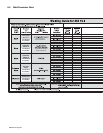
7-7. Troubleshooting Table
Trouble Remedy
No weld output; wire does not feed; fan
does not run.
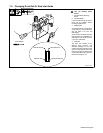
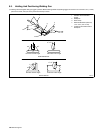
Secure power cord plug in receptacle (see Section 5-7).
Replace building line fuse or reset circuit breaker if open.
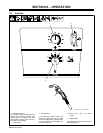
Place Power switch in On position (see Section 6-1).
Reset welding power source supplementary protector (see Section 7-2).
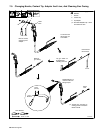
No weld output; wire does not feed; fan
motor continues to run.
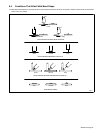
Thermostat TP1 open (overheating). Allow fan to run with gun trigger switch off; thermostat closes when
unit has cooled (see Section 4-2).
Check Voltage range switch position. Rotate knob until it “clicks” into detent at desired range setting.
Secure gun trigger leads (see Section 5-2).
No weld output; wire feeds.
Connect work clamp to get good metal to metal contact.
Replace contact tip (see Section 7-5).
Check for proper polarity connections (see Section 5-5).
Check thumbscrew securing gun end to feed head adapter and tighten if necessary.
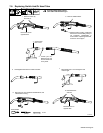
Wire does not feed; wire is not ener-
gized; wire feeds unevenly.
Check contact tip. Check for kinks in gun cable and liner.
Check gun trigger plug connection at welding power source/wire feeder.
Check, and if necessary, replace gun trigger switch (see Section 7-6).
Check contact tip. Check for kinks in gun cable. Blow out liner and gun casing (see Section 7-5).
Low weld output. Connect unit to proper input voltage or check for low line voltage.
Place voltage switch in desired position (see Section 6-1).
Electrode wire feeding stops during
welding.
Straighten gun cable and/or replace damaged parts.
Adjust drive roll pressure (see Section 5-10).
Change to proper drive roll groove (see Section 7-4).
Readjust hub tension (see Section 5-9).
Be sure that wire is positioned in proper drive roll groove and wire is laying in the groove.
Replace contact tip if blocked (see Section 7-5).
Clean or replace wire inlet guide or liner if dirty or plugged (see Section 7-4 or Section 7-5).
Replace drive roll or pressure bearing if worn or slipping (see Section 7-4).
Secure gun trigger leads or repair leads (see Section 5-2).
Check and clear any restrictions at drive assembly and liner (see Section 5-10 or Section 7-5).
Release gun trigger and allow gun and motor protection circuitry to reset (see Section 7-3).
Gun is not secured to feed head. Check thumbscrew securing gun end to feed head adapter and tighten
if necessary.
Have nearest Factory Authorized Service Agent check drive motor.
Weld porosity.
Remove weld spatter buildup in nozzle.
Check O-rings on gun connector and replace if damaged.
Make sure inner head tube is tight in cable connector.
Check gun connector to be sure it is fully inserted into drive assembly.
Check shielding gas flow/supply.