


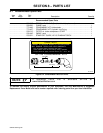


. A complete Parts List is available at www.HobartWelders.com
OM-230 455 Page 25
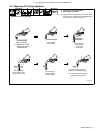
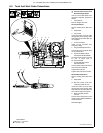
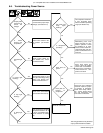
6-6. Troubleshooting Power Source
Connect unit to proper input
voltage. (see Section 4-9).
Yes
No
Is input power
connected to
correct line
voltage?
Is Power
switch in the
On position?
Place Power switch in the
On position. (see Section
5-1).
No
Yes
Is Power light
on?
Check Power switch S1
(see Section 6-2). Check
Control board PC1.
No
Yes
Is Power light
flashing?
Reset Power switch S1 and
verify input line voltage during
cutting (see Section 6-2).
Check Control board PC1.
Yes
No
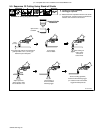
Is Cup light
flashing?
Check torch consumables
(see Sections 6-2 and 6-3).
No
Yes
The compressor current lim-
it was exceeded either
above or below its operating
range (see Section 6-2).
Yes
Yes
Are Power and
Temp lights
flashing?
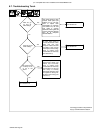
Press torch trigger and
check if pilot arc ignites.
Check torch consumables.
*Check torch connections,
Control board PC1, com-
pressor, and torch.
Yes
No
Does pilot arc
ignite?
Place torch near workpiece
and check if pilot arc “jumps”
or transfers to workpiece.
Check work clamp connec-
tion. *Check Control board
PC1 and connections, and
torch and its connections.
Yes
No
Does pilot arc
transfer to
workpiece?
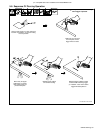
Check all connections.
*Servicing procedure to be performed
only by authorized Service Station.
*
*
*
Momentarily press torch
trigger and listen for com-
pressor operation. Check
for Postflow air at torch.
Check Control board PC1,
compressor filter, and com-
pressor connections to PC1
and torch.
No
Is compressor
operating?
*
No
No
Is Temp light
On?
Unit overheated or ambient
temperature is below −40° C
(−40° F) (see Section 6-2).
Check function of cooling
fan.
Yes
*
*