


11
English
CAUTION:
⅜ Application of force more than necessary will not
only expedite the work, but will deteriorate the tip
edge of the drill bit and reduce the service life of
the rotary hammer in addition.
⅜ Drill bits may snap off while disengaging the rotary
hammer from the jammed hole. For disengaging,
it is important to use a pushing motion or turn the
drill bit counterclockwise.
⅜ Do not attempt to drill anchor holes or holes in
concrete with the machine set in the rotation only
function.
⅜ Do not attempt to use the rotary hammer in the
rotation and striking function with the drill chuck
and chuck adapter attached. This would seriously
shorten the service life of every component of the
machine.
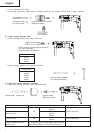
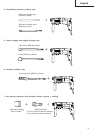
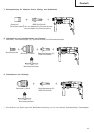
4. When driving machine screws (Fig. 9)
First, insert the bit into the socket in the end of
chuck adapter (D).
Next, mount chuck adapter (D) on the main unit
using procedures described in 4 (1), (2), (3), put the
tip of the bit in the slots in the head of the screw,
grasp the main unit and tighten the screw.
CAUTION:
⅜ Exercise care not to excessively prolong driving
time, otherwise, the screws may be damaged by
excessive force.
⅜ Apply the rotary hammer perpendicularly to the
screw head when driving the screw; otherwise, the
screw head or bit will be damaged, or driving force
will not be fully transferred to the screw.
⅜ Do not attempt to use the rotary hammer in the
rotation and striking function with the chuck adapter
and bit attached.
5. When driving wood screws (Fig. 9)
(1) Selecting a suitable driver bit
Employ cross-recessed screws, if possible, since the
driver bit easily slips off the heads of slotted-head
screws.
(2) Driving in wood screws
⅜ Prior to driving in wood screws, make pilot holes
suitable for them in the wooden board. Apply the
bit to the screw head grooves and gently drive the
screws into the holes.
⅜ After rotating the rotary hammer at low speed for
a while until the wood screw is partly driven into
the wood, squeeze the trigger more strongly to
obtain the optimum driving force.
CAUTION:
Exercise care in preparing a pilot hole suitable for
the wood screw taking the hardness of the wood
into consideration. Should the hole be excessively
small or shallow, requiring much power to drive
the screw into it, the thread of the wood screw may
sometimes be damaged.
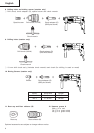
6. Striking only
This rotary hammer can be set to striking only
mode by pressing the push button and turning the
change lever to
mark. (Fig. 10)
(1) Mount the bull point or cold chisel.
(2) Press the push button and set the change lever to
middle of
mark and mark. (Fig. 11)
The rotation is released, turn the grip and adjust
the cold chisel to desired position. (Fig. 12)
(3) Turn the change lever to
mark. (Fig. 10)
Then bull point or cold chisel is locked.
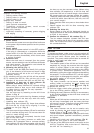
7. Using depth gauge (Fig. 13)
(1) Loosen the knob on the side handle, and insert the
depth gauge into the mounting hole on the side
handle.
(2) Adjust the depth gauge position according to the
depth of the hole and thighten the knob securely.
8. How to use the drill bit (taper shank) and the taper
shank adapter
(1) Mount the taper shank adapter to the rotary hammer.
(Fig. 14)
(2) Mount the drill bit (taper shank) to the taper shank
adapter. (Fig. 14)
(3) Turn the switch ON, and drill a hole in prescribed
depth.
(4) To remove the drill bit (taper shank), insert the
cotter into the slot of the taper shank adapter and
strike the head of the cotter with a manual hammer
supporting on a rests. (Fig. 15)
HOW TO USE THE CORE BIT
(FOR LIGHT LOAD)
When boring penerating large holes use the core bit
(for light loads). At that time use with the center pin
and the core bit shank provided as optional accessories.
1. Mounting
CAUTION:
Be sure to turn power OFF and disconnect the plug
from the receptacle.
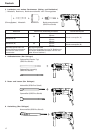
(1) Mount the core bit to the core bit shank. (Fig. 16)
Lubricate the thread of the core bit shank to facilitate
disassembly.
(2) Mount the core bit to the rotary hammer. (Fig. 17)
(3) Insert the center pin into the guide plate until it
stops.
(4) Engage the guide plate with the core bit, and turn
the guide plate to the left or the right so that it
does not fall even if it faced downward. (Fig. 18)
2. How to bore (Fig. 19)
(1) Connect the plug to the power source.
(2) A spring is installed in the center pin.
Push it lightly to the wall or the floor perpendicularly.
Connect the core bit tip flush to the surface and
start operating.
(3) When boring about 5 mm in depth the position of
the hole will be established. Bore after that removing
the center pin and the guide plate from core bit.
(4) Application of excessive force will not only expedite
the work, but will deteriorate the tip edge of the
drill bit, resulting in reduced service life of the
rotary hammer.
CAUTION:
When removing the center pin and the guide plate,
turn OFF the switch and disconnect the plug from
the receptacle.
3. Dismounting (Fig. 20)
Remove the core bit shank from the rotary hammer
and strike the head of the core bit shank strongly
two or three times with a manual hammer holding
the core bit, then the thread becomes loose and
the core bit can be removed.