


27
MAINTENANCE SECTION
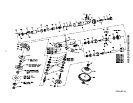
4. Clean the threads on the Arbor; apply a film of
thread locking compound to the threads. Screw the
Bevel Gear Nut (48) onto the Arbor and tighten to 8.5
to 11.5 ft–lb (11.5 to 15.5 Nm) torque. Remove the
Arbor from the vise.
5. Grasp the Angle Arbor Housing (43) in or
leather–covered copper–covered vise jaws, angle
head up. Install the Upper Bearing Spring Washer
(46) and Upper Arbor Bearing (47).
6. If replacement of the Mounting Plate Pin (45) is
necessary, press a new pin into the Angle Arbor
Housing.
7. Install the assembled Depressed Center Wheel Arbor
(55) into the Angle Arbor Housing.
8. Place the Sander Arbor Retaining Plate (52) in
position on the Angle Arbor Housing.
9. Install the Screw Lock Washers (53) and Retaining
Plate Screws. Tighten to 7.5 to 8 ft–lb (10 to 11 Nm)
torque.
10. Install the Pad Mounting Kit Spacers (57) and
Sanding Pad Assembly (56).
For GRP15A Models, install the Wool Bonnet (58).
11. Using the No. 49845–217 Sander Arbor Wrench to
hold the arbor, install the Pad Mounting Kit Nut (57)
and tighten securely.
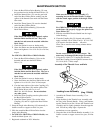
12. Insert a 5” (127 mm) long 3/16” hex wrench into the
elongated slot in the end of the Dead Handle (70) and
into the hex recess in the screw head.
13. Position the Handle against the Angle Arbor Housing
(43) and thread the screw into the Housing. The
Handle can be attached at either of two positions 180
degrees apart. Select the desired position and tighten
the screw to 18 ft–lb. (24.4 Nm) torque.
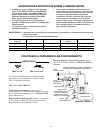
14. Apply approximately 5 cc of IRAX No. 68–1LB
Grease into each Grease Fitting (44).
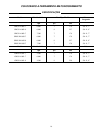
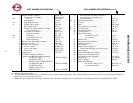
TROUBLESHOOTING GUIDE
Trouble Probable Cause Solution
Low power or low free speed Insufficient air pressure at the
inlet
Check the air pressure at the inlet of the Tool.
It must be 90 psig (6.2 bar/620 kPa).
Plugged Screen Clean the Inlet Bushing Screen in a clean, suitable,
cleaning solution. If it cannot be cleaned,
replace it.
Never operate a Grinder without an Inlet
Bushing Screen. Ingestion of dirt into the
Grinder can, in some cases, cause an unsafe
condition.
Worn or broken Vanes Replace a complete set of new Vanes.
Worn or broken Cylinder Replace the Cylinder if it appears cracked or if the
bore is wavy or scored.
Improper lubrication or dirt
build–up in the motor
Lubricate the Grinder as instructed in
LUBRICATION. If lubrication does not result in
satisfactory operation, disassemble the motor,
clean and inspect all parts.