


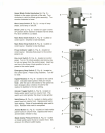
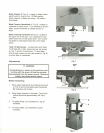
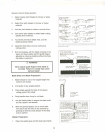

3. Loosen screw (A, Fig. 12). Slide blade stop (B,
Fig. 12) toward blade until a gap of 1/32"
remains. Tighten screw (A, Fig. 12).
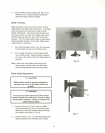
4. Slide blade guide assembly toward blade until
blade guides are behind gullets as in Fig. 13.
Tighten screw (A, Fig. 13)
6.
Loosen two hex cap screws (B, Fig. 12) and
adjust each finger toward the blade. They
should not touch the blade. Adjust for .010"
clearance on either side.
B
5. Open the upper access door and rotate the
blade wheel by hand until the weld portion of
the blade is betweenthe two fingers.
7. Tighten two hex cap screws (B, Fig. 12) once
proper adjustment has been made.
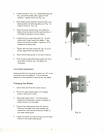
8. Adjust lower blade guide in the same manner.
9.
Even properly adjusted blade guides will show
wear after continual use. Re-adjust as
necessary.
Fig. 12
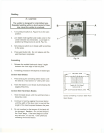
Top Guide Adjustment
Always position the top guide to within an 1/8" of the
top surface of the workpiece. This minimizes
exposure of the operator's handsto the saw blade.
1. Disconnect saw from the power source.
A
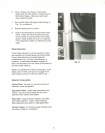
Changing Saw Blades
2. Move the upper blade guide to its highest
position and lock in place.
3. Open both wheel doors. Turn the tension
adjustment handwheel counter-clockwiseto
loosen tension on the blade.
4. Remove the blade guard from the column.
Remove the blade from both wheels and
maneuver it around the protective shield on
the upper blade guide. Fig. 13
5.
Install new blade by maneuvering around blade
shield on the upper blade guide.
7