


12
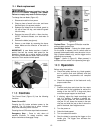
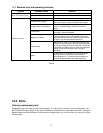
10.4 Blade replacement
Disconnect machine from the
power source before changing saw blades.
Failure to comply may result in serious injury!
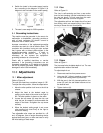
To change the saw blade (Figure 12):
1. Disconnect machine from power.
2. Clamp a piece of wood in the vise, and lower
the blade upon it to prevent rotation.
3. Release the linkage from the blade guard at
(A) with a 5mm hex key, and rotate the guard
out of the way.
4. Remove the screw (B) with a 10mm hex key.
NOTE: Left-hand threads; turn clock-wise to
loosen.
5. Remove the blade (use gloves).
6. Secure a new blade by reversing the above
steps. Make sure the direction of the teeth is
correct.
IMPORTANT: A new blade requires a break-in
period. Use half the normal feed speed for the
operation; operate for a cutting surface of about
300 cm
2
for hard materials; about 1000 cm
2
for soft
materials. Then resume normal speed.
Figure 12
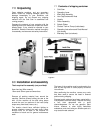
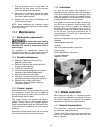
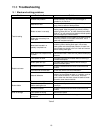
11.0 Controls
The Control Panel (Figure 13) has the following
functions.
Power On and Off.
Pressing the On button activates power to the
machine. The On button has a green indicator
lamp when electrical power is active.
Pressing the red Off button stops blade movement.
Emergency Stop – Press to shut down all
machine functions. To restart machine, rotate
button clockwise to disengage E-stop.
Figure 13
Coolant Flow – The green ON button must be
active to start coolant flow.
Low/Off/High Switch – Selects the blade speed.
For the blade to operate, the On switch must be
pressed, blade speed switch must be set to Low or
High (3-phase models only), and the trigger on the
operating lever pressed.
Trigger – (shown in Figure 3). When pressed, it
activates a micro-switch in the operating lever grip.
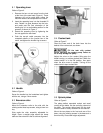
12.0 Operation
Before using the machine:
Check that safety devices (e.g. blade guards)
are in position and work perfectly and that
personal safety requirements are complied
with.
Check the sharpness of the blade and verify
proper coolant flow.
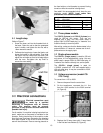
Operating
1. Position work piece and close the vise; rotate
the cam lever at the handwheel to secure the
setting of the vise. NOTE: A long work piece
must have proper support on both ends.
2. If mitering, adjust the head accordingly and
lock it in position. If making a mitered cut,
verify that the blade will not contact the rear
vise jaw. If it will, loosen the screw on the rear
vise jaw and slide the jaw so that it clears the
path of the blade, then retighten screw.
3. Turn the power on.
4. Select the blade speed.
5. Turn on coolant flow switch.
6. Start the blade by pressing the trigger on the
handle grip. The trigger also activates the
coolant flow.