


6
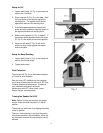
Setup for 90°
1. Loosen both knobs, (A, Fig. 3) and place the
table in the 0° position.
2. Place a square (B, Fig. 3) on the table. Rest
the long section of the square against the
sanding drum. The square should be flat
agianst the table and the sanding drum.
3. If the table needs adjustment loosen both
knobs and tilt the table so thast the square is
flat against the table and sanding drum.
4. Make sure the pointer (C, Fig. 3) reads 0°. If
the pointer needs adjusted loosen the screw
(D, Fig. 3), and adjust to the correct position.
5. Adjust the 90° stop (E, Fig. 3) with a hex
wrench so that it rests against the bottom
side of the table.
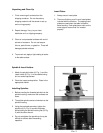
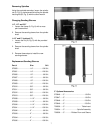
Setup for Bevel Sanding
1. Loosen both knobs (A, Fig. 4) and adjust the
table to the desired angle.
2. Tighten both knobs.
Dust Collection
The dust port (B, Fig. 4) can be hooked directly to
a 2” hose for dust collection.
See your local JET distributor for the complete
line of dust collectors and the full line of JET Dust
Collector Hoses and Accessories. Customize
your installation and obtain maximum
performance with JET's dust hoods, hoses,
clamps, fittings, and blast gates.
Turning the Sander On & Off
Note: Before hooking the sander to the power
source, make sure that the switch is in the off
position.
The sander can be turned on by flipping the switch
to the on position.
Thereisaremovablekeyinthetipoftheswitch
that can be removed in the off position. When the
key has been removed the dust collector cannot
be used.