


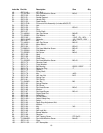
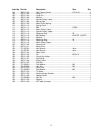

12
Return Spring Adjustment
The return spring is located opposite the downfeed
handle hub and sets the tension for the downfeed
handle. It is adjusted at the factory and should not
need further adjustment.
If adjustment is deemed necessary:
1. Unplug the machine from the power source.
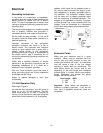
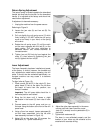
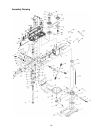
Referring to Figure 9:
2. Loosen the jam nuts (A) and hex nut (B). Do
not remove.
3. Pull out slightly the coil spring cover (C) while
firmly holding it. DO NOT allow the coil spring
cover to turn freely in your hand, or the spring
will unwind.
4. Rotate the coil spring cover (C) until the notch
on the cover engages with the tab (E) on the
head casting. Turn the cover clock-wise to
decrease tension and counter-clockwise to
increase tension.
5. Tighten hex nut (B) firmly by hand against the
cover (C), then secure by tightening the jam
nut (A) against the hex nut (B).
Laser Adjustment
The Laser Assembly has been installed and preset
at the factory. It should, however, be checked and
any adjustments made before operating the drill
press. It should also be rechecked periodically, as
constant machine use may cause it to become
misaligned.
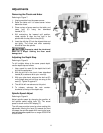
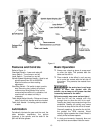
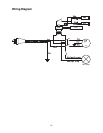
To align (refer to Figure 10):
1. Place a small drill bit (D) in the chuck (C), then
place board (F) flat on the table. Do not allow
the board to move from this position; use
clamps if needed.
Important: The drill press table should be in
horizontal position and locked.
2. Bring the bit down until it leaves a slight
perforation in the board (E) then raise it back
up.
3. Connect power to the drill press, and turn on
the laser using the button at the front of the drill
press head.
4. Using a 3mm hex wrench, loosen setscrews (A)
on both laser assemblies (only the left side
laser assembly is shown in Figure 10).
5. Adjust (B) so the laser line (G) crosses the
perforation (O). Tighten setscrew (A).
Figure 9
Figure 10
6. Adjust the other laser assembly in the same
manner until both laser lines form cross-
hairs (G, H) exactly over the perforation (E) in
the board.
7. Tighten both setscrews (A).
The laser is now calibrated properly and the
location of your holes can be centered at the
crosshairs for accurate drilling.