


13
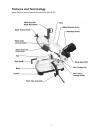
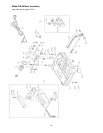
Blade Replacement
1. Disconnect machine from power source.
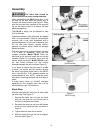
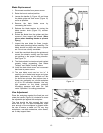
2. Raise the bow to vertical position.
3. Loosen the handle (A, Figure 10) and lower
the blade guide and front cover (Figure 12)
as far as possible.
4. Remove the back blade cover by
unscrewing the knobs.
5. Release the blade tension by turning the
blade tension knob (Figure 10) counter-
clockwise.
6. Extract the blade from the guides and then
remove it from around the wheels. (Wear
gloves when handling blades to prevent
injury.)
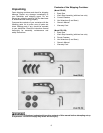
7. Inspect the new blade for flaws (cracks,
broken teeth, bending) before installing. The
blade should be sharp and have a proper
set. Do not use a faulty saw blade.
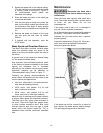
8. Install the new blade through the guides and
around the wheels, making sure the teeth
are pointing in the proper cutting direction.
See Figure 13.
9. The blade should be tensioned and tracked
properly before proceeding. See “Blade
Tension” and “Blade Tracking” above.
10. Install the back blade cover and re-connect
band saw to power source.
11. The new blade must now be “run in.” A
carefully run-in blade lasts longer and gives
better performance. Let the blade run idle
for about two minutes, then perform two or
three cuts, preferably on a solid workpiece
of .40 to .50 millimeter diameter. Use very
light pressure on the blade, gradually
increasing pressure with each cut. See
under “Operation” for cutting procedures.
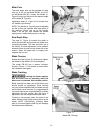
Vise Adjustment
Place the workpiece against the fixed jaw, and
rotate the handle (Figure 14) clockwise to move
the adjustable jaw against the workpiece.
The vise should be tight enough that round
stock will not roll. For short workpieces, make
sure enough of the workpiece is gripped within
the vise to ensure a stable cut. For very long
workpieces, use table extensions, roller stands,
etc. to help support them.
Figure 12
Figure 13
Figure 14