


4
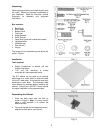
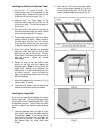
3. Attach a side panel in the position shown in
Figure 4. The fasteners in the edge of the
back panel will slide into the holes in the
side panel.
4. Make sure the side panel is pushed all the
way against the edge of the back panel, and
push the fastener tabs all the way down.
Repeat for the other side panel.
5. Mount the top panel, which has an opening.
6. Attach the bottom panel and make sure all
fastener tabs are pushed down on the
cabinet assembly.
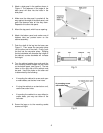
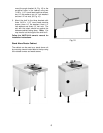
7. Push the shaft of the leg into the base, see
Figure 5. Then screw the connector piece
into the other end of the shaft. Finally, push
the foot into the connector piece. Rotating
the foot clockwise will decrease the height of
the cabinet; counter-clockwise will increase
the height.
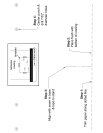
8. Turn the cabinet upside down and push the
four mounting socket screws into the holes
on the bottom panel, see Figure 6. The two
holes on the right side of the cabinet must
be used. Use of the holes on the other end
is determined by the following:
• If mounting the cabinet to a saw and upon
a mobile base, use the two inner holes.
• If using the cabinet as a stand-alone unit,
use the two outer holes.
• If mounting the cabinet to a saw without a
mobile base, you may use either of the
hole sets.
8. Screw the legs on to the mounting socket
screws until tight.