


5
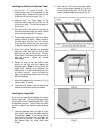
Installing the Cabinet to Extension Table
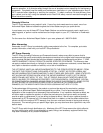
1. Cut the 3/4" x 2” runners to length. This
measurement may vary depending on the
extension table. Measure from the end rail
to the mid rail and cut to length, (Fig. 7).
2. Measure from the outer edge of the
extension table’s side rails to 6-3/4” on the
mid and end rails. This will be the center of
the runners.
3. Drill pilot holes in the end and mid rails so
that the screws don’t split the wood. Attach
the runners with eight #8 x 2” screws.
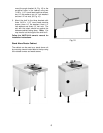
4. Press hinges into the door, and use a rubber
mallet to secure in place. Attach hinges to
the side panel with four #8 x 3/4" screws.
Press the door handle into door, and mount
through the sides with two #6 x 3/4" screws.
5. Place the cabinet beneath the extension
table and make sure that the door is flush
with the outer edge of the end rail. The pre-
drilled holes in the cabinet top should line up
with the runners. Make any needed
adjustments.
6. Adjust the legs so that the cabinet rests
evenly on the floor and flush against the
extension table. Note: Ifyouareusingthe
large shelf between the tablesaw and
cabinet hold it in place and make sure you
will have a snug fit. You do not want any
gaps or the pre-drilled holes may not line up
with the brackets.
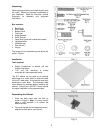
7. Mount the cabinet to the runners (A, Fig. 8)
using six #8 x 2” screws.
8. Insert the shelf holders into the cabinet and
position the shelves to meet your needs.
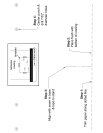
Installing the Large Shelf
If you have an open stand tablesaw you cannot
use the large shelf. The large shelf has a cutout
on the bottom side to accommodate JET’s right
tilt tablesaw dust port. The end with the cutout
should be against the tablesaw cabinet facing
down.
1. Tape the template found on page 8 to the
saw cabinet and follow the steps listed on
the template. Note: Ifyouhavearighttilt
saw remove the dust port and tape the
template to the cabinet. The dust port can
be installed after the holes have been
drilled.
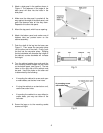
2. After the four 7/32” holes have been drilled
mount the two angle brackets (A, Fig. 9) to
the saw cabinet using four 1/4-20 x 5/8” hex
washer head self tapping screws (B, Fig. 9).