


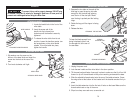
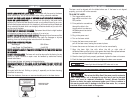
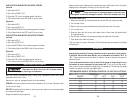

CUTTING CROWN MOULDING, TRIMS AND BASEBOARDS
Cutting crown moulding, trims and baseboards must be done very accurately. If the
angles are not correct, the mouldings will not fit flush with the wall, the ceiling or
each other.
Always practice on scrap material before attempting to
cut the final workpiece.
BASEBOARDS
1. To prevent damaging the surface of the moulding, tape all contact areas before
clamping.
2. Make sure workpiece lies flat against the miter table with one edge pressed
firmly against the fence.
3. Clamp into place with C-clamps or vise clamps.
4. To avoid splintering, place tape over the area to be cut.
5. Mark the cut line on the tape.
6. Make sure you have the right type of blade for the project. If the blade type is
not correct, the moulding may break or splinter.
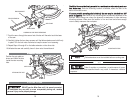
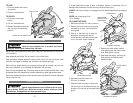
CROWN MOULDING
When cutting crown moulding, use extreme care to get the cut surfaces angled cor-
rectly. When two cut pieces come together, they should make a 90° angle.
1. To prevent damaging the surface of the moulding, tape all contact areas before
clamping.
2. Lay moulding down on the widest part of the back. Make sure workpiece lies
flat against the miter table with one edge pressed firmly against the fence.
3. Clamp into place with C-clamps or vise clamps.
4. To avoid splintering, place tape over the area to be cut.
5. Mark the cut line on the tape.
6. Make sure you have the right type of blade for the project. If the blade type is
not correct, the moulding may break or splinter.
7. Remember that the angle settings for two adjoining pieces of moulding are
dependent on each other. If you change the angle of one side, you must also
change the angle of the corresponding side. For instance, if you subtract 5°
from the left side, you must add 5° to the right side.
8. Always practice on scrap material to make sure the angles are correct before
attempting to cut the final workpiece.
24
8. Replace the outer blade guard, the washer and the arbor screw. Push in on the
arbor lock and turn the arbor screw counter-clockwise until tight.
9. Return the Lower Guard to its location as in step 1.
10.Turn the spring loaded mounting plate until its two mounting holes are lined up
with the holes on the Upper Guard.
11.Secure the Lower Guard with the three mounting screws that were removed in
step 2.
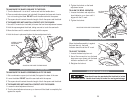
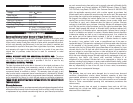
MMAAKKIINNGG AA MMIITTEERR CCUUTT
1. Turn the miter handle counter-clockwise to unlock.
2. Press down on the thumb tab above the handle and turn the miter table to
the angle desired.
3. Release the thumb tab and tighten the handle to lock the table into position.
4.
BBeeffoorree ccuuttttiinngg,, ppoossiittiioonn yyoouurr bbooddyy oouutt ooff tthhee lliinnee ooff ffllyyiinngg ddeebbrriiss.. NNeevveerr
ssttaanndd iinn ffrroonntt ooff tthhe
e ssaaww..
CUTTING BOWED MATERIAL
Cutting a bowed piece of material incorrectly could lead
to kickback and serious personal injury.
Always inspect your workpiece before cutting. If the material is bowed, make sure
the bowed portion points down when you are cutting.
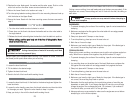
MAKING A BEVEL CUT
1. Loosen the bevel lock knob.
2. Tilt the blade to the desired angle.
3. Tighten the bevel lock knob.
4. Stand to the left of the handle while making the cut.
MAKING A COMPOUND CUT
1. Loosen the bevel lock knob, tilt the blade to the desired angle and tighten the
bevel lock knob.
2. Loosen the miter handle, press down the thumb tab and move the miter table
to the angle you need. Tighten the miter handle to keep it in place.
3. Keep your body in line with the handle while making the cut.
23