


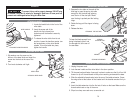
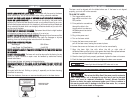
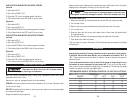

INSTALLING THE DUST BAG
1. Squeeze the two tabs on the neck of the
dust bag to open the spring clip wide
enough to slip the dust bag opening
over the rim of the dust port. Make
sure the bag is pushed past the locking
ridge.
2. Rotate the bag until the zipper is facing
down.
3. Release the tabs.
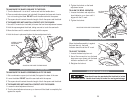
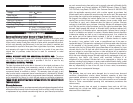
STORING BLADE WRENCH
To keep the blade wrench from
being misplaced, slide it into
the storage slot at the rear of
the saw base.
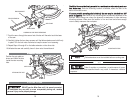
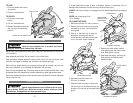
ASSEMBLING TABLE EXTENSIONS
1. Unplug the power cord.
2. Lock the saw handle and the miter table in the down position.
3. Tilt the saw back and fasten it securely in place to make sure that it will not fall
forward or tip off the workbench while you are working underneath the base.
4. Slide the adjustable fence bracket onto the arm of the table extension. Screw
the wing screw at the bottom of the bracket until the bracket remains firmly in
place.
5. Insert the table extension into the first set of holes on the base. Make sure the
fence bracket rests on top of the arms.
6. Slip a bar clamp over each arm, screw side out.
ASSEMBLY
To prevent injury and/or property damage, DO NOT plug
in the saw if any part is missing or damaged. Make sure all saw parts are
present and undamaged before using this Miter Saw.
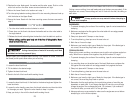
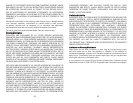
ATTACHING HANDLE
1. Locate the handle hole in the front of the
miter table.
2. Insert the screw end of the
handle into the hole and turn
clockwise until the handle is securely
tightened.
3. To release the miter table from its set
position, loosen the handle a quarter turn
and press down on the miter handle
release. To lock the table into place,
tighten the handle.
ATTACHING BEVEL KNOB
1. Slip washer over the screw on the
bottom of the bevel knob and insert the
screw into the hole at the rear of the
saw.
2. Turn knob clockwise until tight.
1413
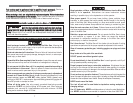
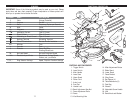
ATTACHING THE MITER HANDLE
MITER HANDLE
BEVEL KNOB
ATTACHING BEVEL KNOB
WRENCH
STORAGE SLOT
WRENCH
STORING THE WRENCH
ATTACHING THE DUST BAG