


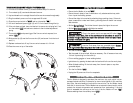

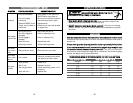

BBRRIINNGGIINNGG WWEELLDDIINNGG WWIIRREE TTHHRROOUUGGHH TTHHEE TTOORRCCHH HHEEAADD
10.Turn the torch handle nozzle (7) counterclockwise and pull to remove.
11.Turn contact tip (8) counterclockwise and remove.
12.Lay torch sheath out in a straight line so the flux-core wire moves through easily.
13.Plug the welder’s power cord into an approved AC outlet.
14.Press the current switch to
““MMAAXX””
and turn the welder
““OONN..””
15.Lift torch handle and press trigger (9) until 2" of wire feeds through the tip.
16.If the wire does not feed, view wire feed unit to ensure wire is being fed. If not,
turn the welder
““OOFFFF””
and add more tension to the wire feed adjustment
spring.
17.Turn welder
““OONN””
and press trigger. One flux-core wire is exposed, turn
welder
““OOFFFF..””
18.Slide contact tip (8) over the flux-core wire (10) and screw it into the torch
end (11).
19.Replace nozzle and cut off any flux-core wire in excess of a 1/4 inch.
20.Close the cover on top of the welder.
8
10
9
8
7
8
11
13
2"
1/4"
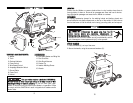
OOPPEERRAATTIINNGG TTHHEE AARRCC WWEELLDDEERR
• Ensure the Arc Welder is turned
““OOFFFF..””
• Ensure the work piece is free of chemicals or oily substances that may catch
fire or impair the welding process.
• Ground the object to be worked by attaching the grounding clamp. If the work
piece is secured to a metal work bench, grounding the work bench is an accept-
able alternate.
• Set the
CCuurrrreenntt SSwwiittcchh..
The thicker the work piece, the higher the current.
• Set the
WWiirree SSppeeeedd CCoonnttrrooll
to
55
. Adjust as needed.
Plug in the power cord to an approved AC outlet.
IIff aann
eexxtteennssiioonn ccoor
rdd iiss uusseedd,, rreeffeerr ttoo tthhee mmaannuuffaaccttuurreerr’’ss iinnssttrruuccttiioonnss ttoo eennssuurree iitt
iiss hheeaavvyy eennoouugghh ttoo hhaannddllee tthhee llooaadd.
. IIff tthhee eexxtteennssiioonn ccoorrdd iiss ttoooo lliigghhtt,, iitt mmaayy
bbeeccoommee oovveerrhheeaatteedd aanndd iiggnniittee..
Hold the Torch away from any grounded object.
CCoonnttaacctt
wwiitthh aa ggrroouunnddeedd o
obbjjeecctt mmaayy ccaauussee tthhee ttoorrcchh ttoo iinnaaddvveerrtteennttllyy iiggnniittee..
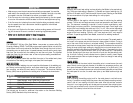
• Turn the Arc Welder
““OONN..””
• Test the speed of the wire feed. Adjust as necessary. Cut off excess wire so only
1/4 inch is protruding from the torch tip.
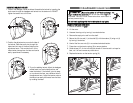
• Put on welding goggles or lower welding helmet.
• Ignite the arc by passing the electrode wire back and forth over the work piece.
• When finished welding, lift the torch away from the work piece or any other
grounded objects.
• Turn the Arc Welder
““OOFFFF..””
• Unplug the AC power cord from the receptacle.
DDUUTTYY CCYYCCLLEE AANNDD TTHHEERRMMAALL OOVVEERRLLOOAADD OOPPEERRAATTIIOONN
This Arc Welder is designed to operate at the maximum duty cycle, which is a per-
centage of actual weld time. For example, for a ten minute interval at 10% maximum
duty cycle, the actual welding time would be one minute. The Arc Welder should
then cool for nine minutes. The Arc Welder has an automatic thermal switch, which
protects the internal components and accessories from overheating. If the duty
cycle is exceeded the red lamp on the front of the Arc Welder will turn
““OONN..””
Resume welding when the red lamp turns
““OOFFFF..””
14