


7
SWITCHING ON AND OFF
Before inserting the battery pack into the saw always check that the on/off switch º is working
properly and that when you release it, the switch returns into the OFF setting.
This circular saw is fitted with a switch lock
¾. The on/off switch º does not lock itself on.
To switch on first press the switch lock ¾ and then (keeping the switch lock pressed) press the
on/off switch º.
Once the saw is running you can release the switch lock again.
To switch off the saw, release the on/off switch º.
OPERATION
Hold the saw in a firm grip. With the blade not yet rotating, set the guide plate · down on
to the workpiece to be cut. Switch the saw on and wait until the blade is rotating at full speed.
Now, keeping the machine level, push it evenly over the workpiece surface until the cut is
completed.
To achieve a clean cut, use the second hand grip
µ and cut in a straight line, travelling over
the workpiece at an even speed.
CAUTION:
1. The riving knife must always be correctly fitted (except for plunge cutting).
2. Never attempt to bring the saw blade to a standstill by pressing on its side.
3. If the circular saw is used continuously until the battery is completely discharged, then you should
let the machine rest for 15 minutes before starting it again with a freshly charged battery.
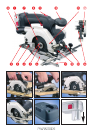
FITTING AND REMOVING SAW BLADES
Before fitting or removing a saw blade always make sure that the circular saw is switched off
and the battery pack is removed.
Removing a saw blade:
Press the spindle stop ታ to prevent the saw blade from rotating. Release the screw ´ by turning
the socket wrench anticlockwise. Remove the screw ´, outer flange ¿ and saw blade ¶.
Fitting a saw blade:
Carry out the steps detailed in "Removing a saw blade" in reverse order. Then finally fully tighten
the screw ´.
When fitting the blade, make sure that it is mounted in the correct direction of rotation
ƺ.
SETTING THE GUIDE PLATE
The default setting or the angle of the guide plate to the saw blade is 90°. If you wish to adjust
this angle use the angle adjuster Ƹ.
Please read the last part of these instructions for how to exactly adjust the angle adjuster.
SETTING THE CUTTING ANGLE
You can set the cutting angle accurately using the cutting angle scale. Release the wing nut
on the angle adjuster Ƹ and set the required angle on the scale before retightening the wing nut.
Caution: Check the cutting angle on a test cut!
ƽ
ƽ
ƽ