


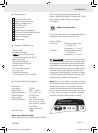

10 GB/IE/CY
General safety advice for electrical power tools / Preparing for use
footing and balance, hold the hammer drill
firmly with both hands and use the auxiliary
handle
9
.
J
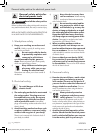
Wear safety glasses and a
dust mask! POISONOUS
DUSTS! Working with harmful / noxious dusts
represents a risk to the health of the person op-
erating the device and to anyone near the
working area.
J Do not drill any material containing
asbestos. Asbestos is a known carcinogen.
J Do not allow the ventilation slots to become
covered while the device is operating. Do not
insert any objects into the ventilation slots.
Q
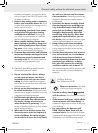
Attention! Service lines!
WARNING!
Take steps to ensure that
you do not hit upon any service lines
(electricity, gas, water) when working
with electrical appliances. Check, if need be
with a service line detector, before you start to cut
or bore into a surface.
Q
Original ancillaries / accessories
J Use only the ancillaries and accessories
that are detailed in the operating in-
structions. The use of ancillaries and acces-
sories other than those recommended in the
operating instructions could lead to an increased
risk of personal injury for you.
Q
Preparing for use
Note the mains voltage! The voltage of the
mains socket must match that shown on the rating
plate on the device (Devices marked with 230 V
~
can also be operated at 220 V
~
).
Q
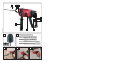
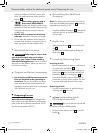
Assembling the Additional
Handgrip
Note: For safety reasons this device may only be
used when the additional handgrip
9
is correctly
assembled (see also Fig. D, E).
j Attach the additional handgrip
9
to the spindle
neck and turn it in an anticlockwise direction
until it is tight.
Q
Depth stop
j Setting the depth stop
10
in the auxiliary han-
dle
9
.
j Set the required drilling depth by sliding the
depth stop
10
.
Q
Inserting / Removing Tools
Inserting a Tool:
j Before inserting the tool, apply a small amount
of grease to the tool holder
1
.
j In order to insert the tool, pull the locking / un-
locking cap
3
to the rear and insert the tool.
j Release the locking / unlocking cap
3
. This
locks the tool holder in place. Pull the tool to
ensure that it is firmly locked in place. The tool
has some radial play inherent in the system.
Removing a Tool:
j In order to remove the tool, pull the locking /
unlocking cap
3
to the rear.
Q
quick action chuck
for round-shank drills
WARNING!
Do not use the round-shank drill
for hammer drilling or chiselling work!
j Set the function selector switch
8
to the drill
symbol
.
E3744_Hammer Drill_Content_LB3.indd 10 16.04.2008 8:26:21 Uhr