


B-6
OPERATION
B-6
OPERATION WITH PREVIOUS
SOFTWARE VERSION
The operation of the previous Control Box software
version (S24004-2) is different than described earlier
in this section. The differences are as follows:
• The Memory/Dual Procedure panel is not a valid
option.
• The MX (K1542-1) and MSP (K1542-8) are are
used in place of the MX2 and MSP2 options.
• Limits cannot be set.
The key difference in the MX/MSP panels, compared
to the MX2/MSP2 panels, is the Spot function. In the
old software, a 0.1 to 2.5 second Spot function was
available on these two panels. No Crater function was
available (Crater replaced Spot in the graphics on
these two panels).
An upgrade kit is available to change the software
from S24004-2 to the latest version of Control Box
software. Once the upgrade is done, the Dual
Procedure/ Memory panel becomes a valid option,
limits can be set, and Spot is replaced by Crater.
WIRE DRIVE OPERATION
The most frequently used Wire Drive settings are
external; some features are accessed by internal set-
tings.
WIRE DRIVE SETTINGS -- EXTERNAL
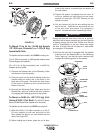
2 STEP / 4 STEP SWITCH:
The Wire Drive has a 2 Step / 4 Step switch located on
the gun side of the Status LED. This switch has no
effect in CC modes of operation, such as stick welding.
When using 2 Step Logic:
1. Closing the gun trigger initiates the welding
sequence (preflow, run in, etc.).
2. Opening the gun trigger ends the arc begins burn-
back, postflow, etc..
When using 4 Step Logic With Crater Fill “OFF”:
1. Closing the gun trigger initiates the welding
sequence (preflow, run in, etc.).
2. Opening the trigger after the welding arc is estab-
lished allows the weld to continue as long as cur-
rent flows. If the arc goes out, the 4 step cycle is
reset.
3. Closing the trigger again allows the weld to contin-
ue.
4. Opening the trigger again ends the arc begins
burnback, postflow, etc..
When using 4 Step Logic With Crater Fill “ON”:
1. Closing the gun trigger initiates the welding
sequence (preflow, run in, etc.).
2. Opening the trigger after the welding arc is estab-
lished allows the weld to continue as long as cur-
rent flows. If the arc goes out, the 4 step cycle is
reset.
3. Closing the trigger again changes the wire feed
speed and the Volts/Trim to the Crater values, and
the weld to continues
4. Opening the trigger again ends the arc begins
burnback, postflow, etc..
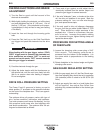
COLD FEED / GAS PURGE SWITCH:
The Wire Drive has a Cold Feed/Gas Purge Switch
located near the gun connector. This is an up/down
center-off momentary toggle switch.
When held in the up position, the Wire Drive will feed
wire, but neither the power source nor the gas sole-
noid will be energized. When cold feeding, the feed
speed can be adjusted by rotating the WFS encoder
knob on the Control Box. Adjusting the cold feed will
not affect the run in or welding wire feed speed.
When the cold feed switch is released, the cold feed
value is saved.
When this switch is held in the down position, the gas
solenoid valve is energized, but neither the power
source nor the drive motor will be energized.
POWER FEED 10