


,*'-$+ '',!&
##&#!&&*+ !$R(*'
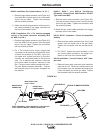
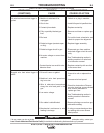
Observe all Safety Guidelines detailed throughout this manual
If for any reason you do not understand the test procedures or are unable to perform the tests/repairs safely, contact your
$B64?$<A6B?AHG;BE<M87<8?7+8EI<6846<?<GL for technical troubleshooting assistance before you proceed.
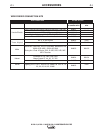
-,!'&
(*'$%+
+1%(,'%+
('++!$
-+
*'%%&
'-*+',!'&
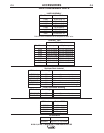
Intermittent wire feed when trigger
is pulled.
Frequent birdnesting or kinking of
wire in the gun cable.
Frequent occurrence of contact tip
burnback.
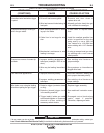
Poor weld bead appearance.
Wire feeder runs or begins feeding
wire without pulling the gun trigger.
1. Drive roll has become galled.
2. Wire has become kinked along its
feed path.
1. Wire shavings/lubricant is build-
ing up in the cable.
2. Cable liner is too large for wire
size.
3. Mechanical resistance to wire
feeding is too large.
1. Improper welding parameters or
technique (example: ESO is too
short).
2. Wire may be feeding intermittent-
ly.
1. Improper electrode polarity.
2. Improper welding parameters or
technique.
1. Defective trigger (contacts closed
or dirty).
2. Defective (closed) trigger circuit
in the welding machine.
3. Trigger lead(s) inside gun cable
are shorted together or commonly
shorted to either welding or
accessory switch circuits.
1. Remove and then clean or
replace drive roll.
2. Manually pull wire slowly thru gun
until unkinked wire emerges.
1. Clean cable or replace cable
liner.
2. Install the smallest possible liner
which is specified for the wire
being used (i.e. use a .052-1/16
liner instead of a 1/16-5/64 liner
when welding with 1/16” diameter
wire.
3. If using a reverse bend gun tube,
try welding with a non reverse
bend product.
1. See welding wire literature for
proper settings.
2. See symptoms on intermittent or
sluggish wire feed.
1. Reconnect machine’s welding out-
put to proper electrode polarity.
2. See welding wire literature for
proper settings.
1. Replace trigger assembly.
2. See machine’s instruction manu-
al.
3. Damaged control leads along
cable; repair if possible.
Otherwise, replace gun cable.