


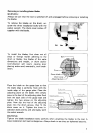
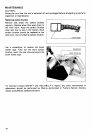


2.
To
create
a
flat surface, loosen the wing
I
nut after setting the tool on
a
level
sur-
face. Turn the front knob on the tool
until the front base
is
perfectly
level
with the rear base. Then tighten the
wing nut securely.
Wing
nut
F
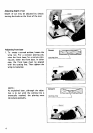
Switch action
To start the tool, simply pull the trigger.
Release
the trigger to stop. For continuous
operation, pull the trigger and then push in
the lock button. To stop the tool from the
locked position, pull the trigger fully, then
release
it.
WARNING:
Before plugging in the tool, always check to
see
that the trigger switch actuates properly
and returns to the "OFF" position when released.
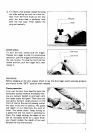
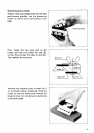
Planing operation
First, rest the tool front base flat upon the
workpiece surface without the blades mak-
ing any contact. Switch on and wait until
the blades attain full speed. Then move the
tool gently forward. Apply pressure on the
front of tool
at
the start of planing, and
at
the back
at
the end of planing. The speed
and depth of cut determine the kind of
finish. The power planer keeps cutting
at
a
speed that will not result in jamming by
chips. For rough cutting, the depth of cut
can be increased, while for
a
good finish
you should reduce the depth of cut and
advance the tool more slowly.
7