


8.
Tips on Cutting
This
tool
is equipped with an electric safety brake which stops the saw blade within
three seconds
from
the moment you release the switch
in
the operating handle. This
safety feature can also be used
to
advantage, for example, in cutting certain materials like
light aluminum or plastics where special shapes are required, or
in
edge cuts
in
wood
where only a little stock is cut off. In this case, the saw blade is retracted after the blade
stops, and the
cut
end will not be contacted by a spinning blade as in a regular saw.
Thus,
a cleaner
-
as well as safer
-
cut is p'ossible.
"Always keep the table top clear
of
chips, small pieces and
so
on in order
to
maintain a
safe, clean surface.
9.
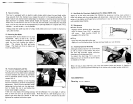
Removing Saw Blade
Depressed shaft lock as shown in
0
to
lock
shaft/blade. Next, as seen in
0,
use the
socket wrench provided
to
loosen (clock-
wise) the hex bolt holding the blade in
place. The remove the bolt and outer
flange. The blade can thus be taken
out
from the safety cover.
10.
Factory-Adjusted Lock Nut
The hex lock nut holding together the gear
housing and arm has been factory-adjusted
to assure smooth arm action up and down
and to guarantee precise cutting.
Do
not
temper with
it.
Should looseness develop at the housing
and arm connection, perform the following
adjustment. Work the arm vertically while
tightening the hex lock nut: the best posi-
tion
to
fasten the nut is just before the
motor body weight is obvious.
I
Shaft
lock
/
0
fig.
9
0
Fig.
10
Fig.
11
If
the nut is too
loose,
the cutting accuracy
will
be affected;
if
it
is
too
tight,
it
will be
hard
to
work the arm up and down easily. Note that this is a
self
locking nut; it
is
a
special type that does not remove in the usual manner, and
so
it
should not be over-
tightened or replaced with other types.
6
11.
Saw Blade
for
Aluminum Applications
(For
Model
2401B
only)
Apply
oil
to
the miter saw blade
(No.
255-4A) for aluminum cutting, since without
it
chips will adhere and the cutting edges will deteriorate. Apply
oil
near the arbor at the
center
of
the blade; centrifugal force will distribute it
out
to
the tips.
No
oil
is required
with carbide-tipped blades.
12.
Maintenance
%
Carbon Brushes
Replace carbon brushes when they wear
down
to
about
6
mm
(1/4")
or sparking
will occur. Both brushes should be
changed
at
the same time.
Oiling
1
Fig.
1
Clean the
tool
thoroughly after use.
Apply
oil
to
all sliding surfaces, the base and saw blade as a rust inhibitor.
13.
Attaching Optional Dust Bag
Although sawdust ejection can be directed
at will by means
of
the elbow, the use
of
the dust bag provided makes collection
complete and cutting operations.
To attach the dust bag,
fit
it
onto the
elbow and turn to the left
to
lock in place;
it
releases
to
the right.
When the bag is about half
full,
just unzip the fastener below and empty
it,
slapping it
lightly
so
as
.to
remove particles adhering
to
the insides which might hamper collection.
ACCESSORIES
Dust Bag
Part
No.
166004-3