


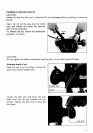


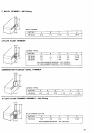

Adjusting lock
lever
The locked position of the lock lever
is
adjustable. To adjust
it,
loosen the lock
lever
3/4
turn and press the center of the
lock lever. The hex nut will come out. Set
the hex nut to the desired position and
tighen the lock lever.
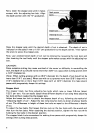
Switch action
To
start the tool, simply pull the trigger.
Release
the trigger to stop.
CAUTION:
Before plugging in the tool, always check
to
see
that the trigger switch actuates pro-
perly and returns to the
"OFF"
position
when released.
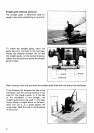
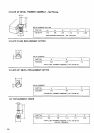
Operation
*Set the tool base on the workpiece to be cut without the bit making any contact. Then
turn
the
tool on
and
wait until
the
bit
attains full speed. Lower the tool body and move
the tool forward over the workpiece surface, keeping the tool base flush and advancing
smoothly until the cutting
is
complete.
When doing edge cutting, the workpiece surface should be on the left side of the bit in
the feed direction. (See the figure below)
Feed direction
r__-,
~..
///,'/!3it
revolving direction
7,
(View from the top of the tool)
v
Correct bit feed direction
NOTE
:
Moving the tool forward too fast may cause
a
poor quality of cut, or damage to the bit
or motor. Moving the tool forward too slowly may burn and mar the cut. The proper
feed rate will depend on the bit
size,
the
kind of workpiece and depth of cut. Before
beginning the cut on the actual workpiece,
it
is
advisable to make
a
sample cut
on
a
piece of scrap lumber. This will show exactly how the cut will
look
as
well
as
enable you
to check dimensions.
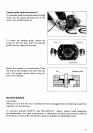
*When using the straight guide, be sure to install
it
on the right side in the feed direction.
This will help to keep
it
flush with the side of the workpiece.
7