


6
INSTALLATION
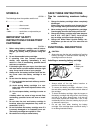
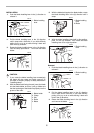
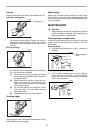
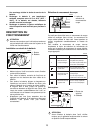
1. Push the blade installing lever in the (1) direction to
release it.
2. Pull the blade installing lever in the (2) direction
until it stops with a little click. If you have difficulty
pulling it out, try to do so while moving it back and
forth in the (3) direction.
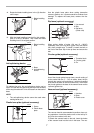
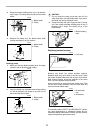
3. Rotate the blade installing lever in the (4) direction
until the clamp protrudes 5 - 7 mm from the blade
holder.
CAUTION:
• If you rotate the blade installing lever excessively,
the clamp will also rotate and finally come off. In
this case, re-install it properly as lately described in
’’Installing clamp’’.
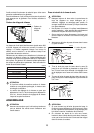
4. With the blade teeth facing forward, insert the blade
into the blade holder as far as it will go. Make sure
that the back edge of the blade fits properly into the
groove of the roller.
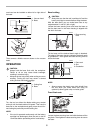
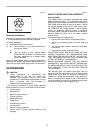
5. With the blade held against the blade holder, rotate
the blade installing lever in the (5) direction until it
stops.
6. With the blade installing lever held in this position,
push it in the (6) direction. Then rotate the blade
installing lever to its original position.
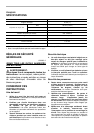
Removal
1. Push the blade installing lever in the (1) direction to
release it.
2. Pull the blade installing lever in the (2) direction
until it stops with a little click. If you have difficulty
pulling it out, try to do so while moving it back and
forth in the (3) direction.
3. Rotate the blade installing lever in the (4) direction
and remove the blade.
1. Blade installing
lever
1. Blade holder
2. Clamp
3. Slot
4. Roller
5. Blade
(1)
1
002719
(2)
(3)
(4)
002720
1
2
3
4
5
002721
1. Blade installing
lever
2. Blade
1. Blade installing
lever
1. Blade installing
lever
1
2
(5)
002722
(6)
1
002723
(1)
1
002719
(2)
(3)
(4)
002720