


7
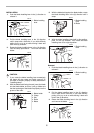
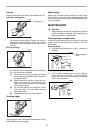
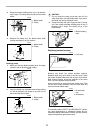
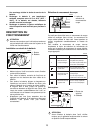
4. Rotate the blade installing lever in the (5) direction
until it stops.
5. With the blade installing lever held in this position,
push it in the (6) direction. Then rotate the blade
installing lever to its original position.
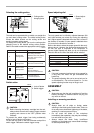
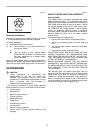
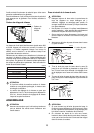
Anti-splintering device
For splinter-free cuts, the anti-splintering device can be
used. To install the anti-splintering device, move the base
all the way forward and fit it into the base from the back of
base.
NOTE:
• The anti-splintering device cannot be used when
making bevel cuts.
Plastic base plate (optional accessory)
Use the plastic base plate when cutting decorative
veneers, plastics, etc. It protects sensitive surfaces from
damage. To replace the base plate, remove the four
screws.
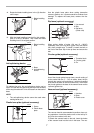
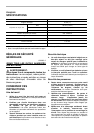
Rip fence (optional accessory)
When cutting widths of under 150 mm (5 - 29/32”)
repeatedly, use of the rip fence (guide rule) will assure
fast, clean, straight cuts. To install it, loosen the bolt on
the front of the base. Slip in the rip fence and secure the
bolt.
Circular guide (optional accessory)
Use of the circular guide insures clean, smooth cutting of
circles under 200 mm (7 - 7/8”) in radius. Insert the pin
through the center hole and secure it with the threaded
knob. Move the base of the tool forward fully. Then install
the circular guide on the base in the same manner as the
rip fence (guide rule).
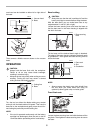
Vacuum head (optional accessory)
The vacuum head is recommended to perform clean cut-
ting operations. Install the plastic cover on the tool by fit-
ting it into the notches in the tool.
To attach the vacuum head on the tool, insert the hooks
of the vacuum head into the hole in the base. The vac-
1. Blade installing
lever
1. Blade installing
lever
1. Base
2. Anti-splintering
device
1. Screw
2. Plastic base
plate
(5)
1
002724
(6)
1
002723
1
2
002734
1
2
002736
1. Hex wrench
2. Bolt
3. Rip fence
(Guide rule)
1. Threaded knob
2. Circular guide
3. Pin
1. Notches
2. Base
3. Plastic cover
1
2
3
002738
1
2
3
002739
1
2
3
002740