


[1] DISASSEMBLING / ASSEMBLING
[1]-2. Terminal cover
DISASSEMBLING
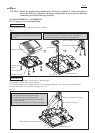
1. While compressing a couple of Compression spring 4 toward
the retaining portions of Terminal cover, insert the boss of
Terminal cover into the elliptic hole of Charger case.
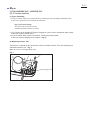
Terminal
cover
Fig. 4
Fig. 3
3x10 Tapping
screw
Charger case
Terminal cover
Compression
spring 4 (2 pcs.)
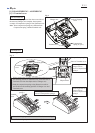
Remove 3x10 Tapping screw from the reverse side of
the removed Charger case complete, then separate
a couple of Compression spring 4 from Terminal cover.
Note: These compression springs are different from
Compression spring 4 behind Terminal unit.
Refer to Fig. 4.
ASSEMBLING
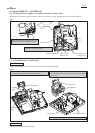
Retaining portion
Boss
P 3/ 5
Repair
Compression
spring 4
Elliptical hole
Boss of Terminal cover
Compression spring 4
Retaining portion of
Charger case to
receive Compression
spring 4
2. Push the compression springs using Slotted screwdriver
and fit them to the retaining portions of Charger case and
Terminal cover.
3. Drive 3x10 Tapping screw to the boss of Terminal cover. (Fig. 3)
Note: The fastening torque has to be 0.5N.m. (5kgf.cm)
Terminal
cover
Retaining portion of
Charger case to
receive Compression
spring 4
Retaining portion of Terminal cover
to receive Compression spring 4