Repair
P 9/ 14
[4] DISASSEMBLY/ASSEMBLY
[4]-9. Recoil starter
(1) Remove Starter case from Engine.
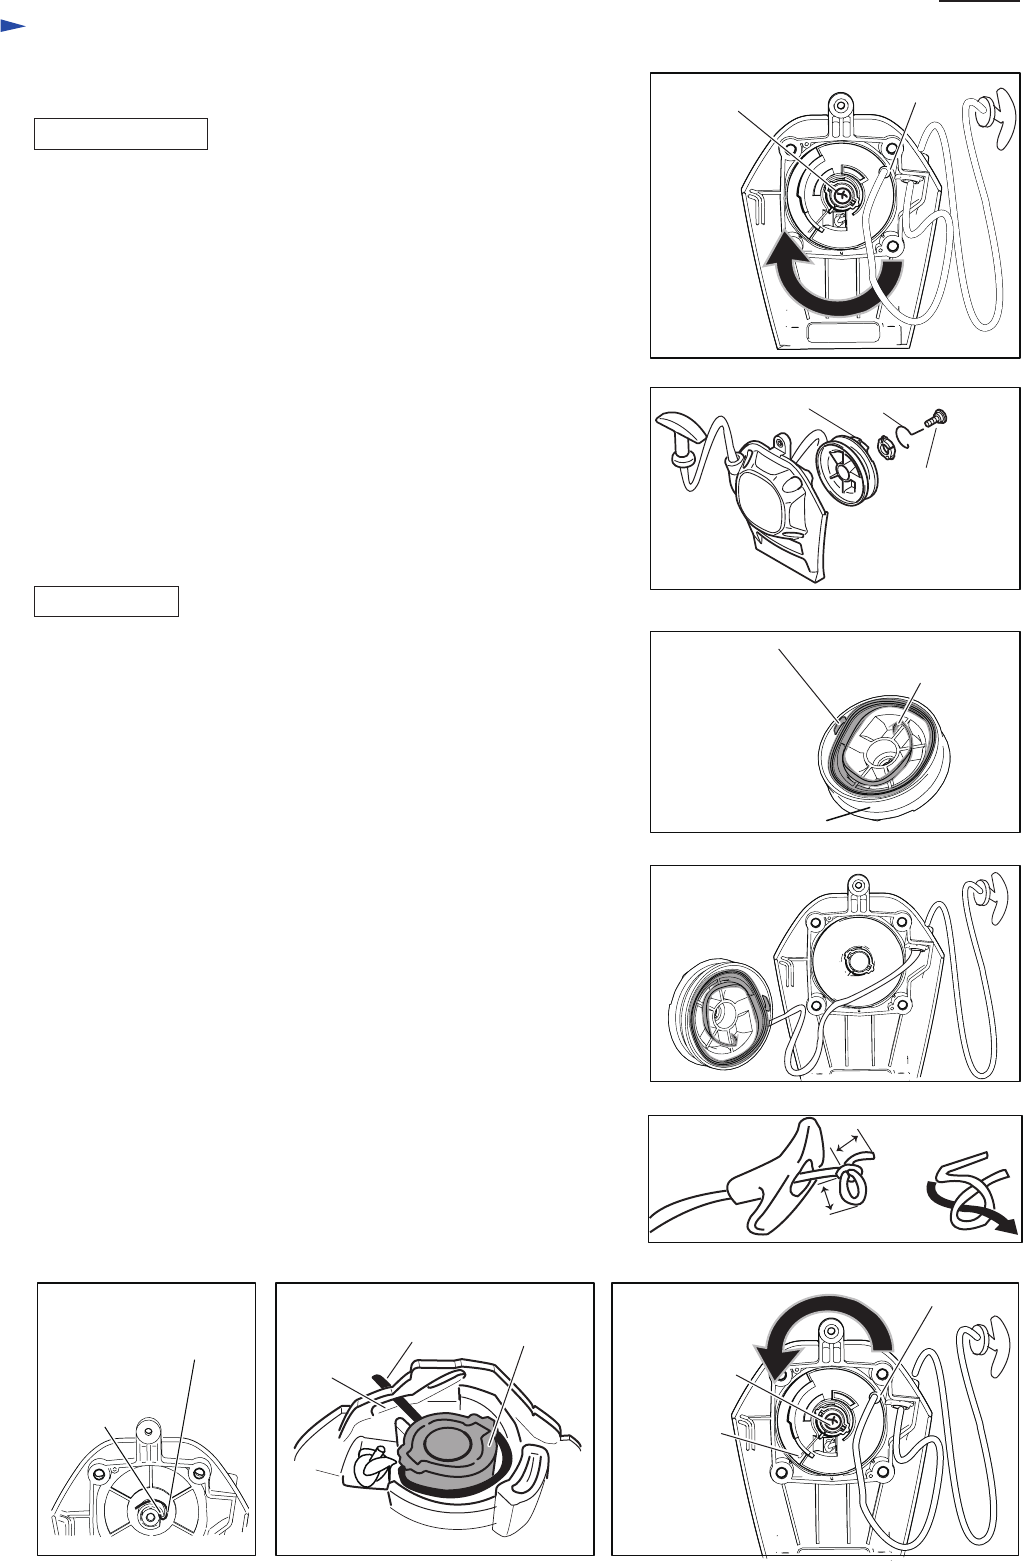
(2) Pull out and cut the rope when it is still connected.
If it is impossible to cut Starter rope;
First, pull the rope one turn of Reel, then, Hook the rope with
the notch of Reel and turn the hooked rope
clockwise until Spiral spring loses the tension. (Fig. 39)
Note: Be careful. Reel is revolved by the recoil force of Spiral spring.
(3) Loosen M5x12 Tapping screw and remove Swing arm and Reel from
Starter case. (Fig. 40)
Note: Be careful when removing this screw as there is a possibility
that Spiral spring pops out.
(4) Untie the knot of the rope in Reel and remove the rope from Reel.
ASSEMBLING
(1) When Spiral spring pops out of Reel:
- Set the one end of Spiral spring in the slot outer side in the Reel.
- Rewind the spring counterclockwise toward the center of circle and
fit the spring end in the slot inside of Reel. (Fig. 41)
(2) Apply a little amount of Makita grease N No.2 to the spring.
(3) Make a knot on the new rope end and pass it through Reel and
Starter case, then, connect the other end to Starter knob. (Fig. 42)
Refer to Fig. 43 how to make a knot of the rope.
(4) Wind the rope two or three turns.
(5) While turning Reel counterclockwise, fit it into Starter case and hook
Spiral spring end on the rib inside of Starter case. (Fig. 44)
Note: This should be fixed without force.
(6) Set Collar and Swing arm in place, then secure them with M5x12
Tapping screw. (Fig. 45)
Swing arm has to be passed through the groove of Reel.
Important: In case Reel turning is not smooth after tightening M5x12
Tapping screw, Reel is not properly fixed to Starter case.
Repeat the step (5) so that Reel can revolves smoothly
even after M5x12 Tapping screw is completely tightened.
(7) Hook the rope in the notch of Reel while straining the rope, then,
turn reel counterclockwise. (Fig. 46) When the rope is removed
from the notch, the Reel winds the rope with spring recoil force.
Repeat the step until the rope slacks are cleared.
Fig. 39
Fig. 43
Fig. 45 Fig. 46Fig. 44
Fig. 40
Fig. 41
Fig. 42
DISASSEMBLING
notch of Reel
Curved end of Spiral
spring (Inside)
Curved end of
Spiral spring
(Outer side)
Reel
M5x12
Tapping screw
(Set screw)
M5x12 Tapping
screw
(Set screw)
Swing arm
Reel
M5x12
Tapping screw
(Set screw)
notch of Reel
Swing arm
Inside curved end
of Spiral spring
Inside rib of
Starter case
Swing arm Collar
Groove of Reel
to hook
Swing arm
Approx. 10mm
Approx. 10mm


