


Hammer drilling operation
Position the bit at the location for the hole, then pull
the trigger.
Do not force the tool. Light pressure gives best
results. Keep the tool in position and prevent it from
slipping away from the hole.
Do not apply more pressure when the hole becomes
clogged with chips or particles. Instead, run the tool at
an idle, then remove from the hole. By repeating this
several times, the hole will be cleaned out.
CAUTION:
When the bit begins to break through concrete or if
the bit strikes reinforcing rods embedded in concrete,
the tool may react dangerously. Maintain good bal-
ance and safe footing while holding the tool firmly with
both hands to prevent dangerous reaction.
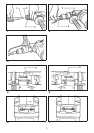
Dust collector (Fig. 9)
Use the dust collector for safe, sanitary overhead
operations. Install the bit, then attach the dust collec-
tor on the end by turning and applying pressure. Then
secure it by turning the metal retainer clockwise.
CAUTION:
Empty the dust collector of its contents after drilling
every 2 or 3 holes.
Drilling in wood or metal (Fig. 10)
For HR1820
Set the push rod for ``rotation only''. Use the optional
drill chuck and chuck adapter for drilling up to 10 mm
in metal and up to 15 mm in wood. To install the drill
chuck and chuck adapter, refer to ``Installing or
removing drill bit''.
For HR2510
Set the change lever for ``rotation only''. Use the
optional drill chuck and chuck adapter for drilling up to
13 mm in metal and up to 30 mm in wood. To install
the drill chuck and chuck adapter, refer to ``Installing
or removing drill bit''.
CAUTION:
When the drill chuck is installed on this tool, do not
use ``rotation with hammering'' action. The drill chuck
and chuck adapter may be damaged.
MAINTENANCE
CAUTION:
Always be sure that the tool is switched off and
unplugged before carrying out any work on the tool.
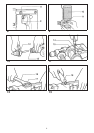
Replacement of carbon brushes (Fig. 11)
Whenever carbon brushes must be replaced, they cut
out the tool automatically. When this occurs, replace
both carbon brushes at the same time. Use only
identical carbon brushes.
Lubrication (Fig. 12 & 13)
This tool requires no hourly or daily lubrication
because it has a grease-packed lubrication system.
Lubricate the tool every time the carbon brushes are
replaced.
Run the tool for several minutes to warm it up. Switch
off and unplug the tool. Remove the crank cap using
a Makita lock nut wrench 35 (optional accessory).
Rest the tool on the table with the bit end pointing
upwards. This will allow the old grease to collect
inside the crank housing. Wipe out the old grease
inside and replace with a fresh grease (60 g). Use
only Makita genuine grease (optional accessory).
Filling with more than the specified amount of grease
(approx. 60 g) can cause faulty hammering action or
tool failure. Fill only with the specified amount of
grease. Reinstall the crank cap and tighten with the
lock nut wrench. Do not tighten the crank cap exces-
sively. It is made of resin and is subject to breakage.
To maintain product safety and reliability, repairs,
maintenance or adjustment should be carried out by a
Makita Authorized Service Center.
Made in Japan
883436E6