


9
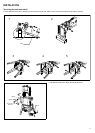
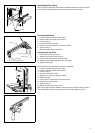
Installing the Rip Fence
The rip fence can be used on both sides of the blade. When the rip fence is moved
from one side of the saw blade to the other the fence needs to reversed.
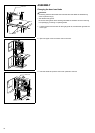
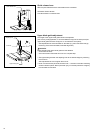
Reversing the fence
1. Loosen knob (B) of the hold-down clamp.
2. Remove hold-down clamp from the fence.
3. Loosen knob (A).
4. Lift fence off the fence holder.
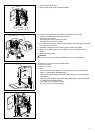
5. Reverse fence and slide back on the fence holder.
6. Tighten knob (A).
7. Slide hold-down clamp on the fence.
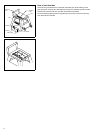
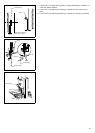
Clamping the rip fence
1. Place rip fence on the guide rail.
2. Tighten the lock lever of the rip fence.
3. Loosen the knob (B) of the hold-down clamp.
4. Slide hold-down clamp against the rear table edge.
5. Tighten the knob (B).
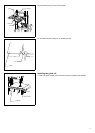
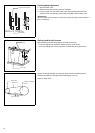
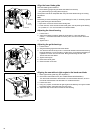
Fence height can be lowered when cutting thin materials.
1. Loosen knob (B) of the hold-down clamp.
2. Remove hold-down clamp from the fence.
3. Loosen knob (A).
4. Lift fence off the fence holder.
5. Slide knob (A) away from fence to remove.
6. Rotate fence 90º.
7. Insert knob (A) into the other groove of the fence.
8. Return fence to fence holder.
9. Tighten knob (A).
10. Slide hold-down clamp on the fence.
When fence height has been lowered, the 0 (zero) point changes. If the rip fence is
on the left side of the blade, slide the guide rail to the left to adjust to 0 point.
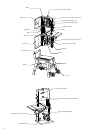
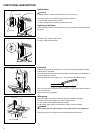
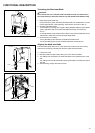
Rip fence
Knob (A)
Fence
Knob (B)
Hold-down clamp
Lock lever
Fence holder