


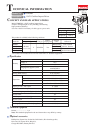

Repair
P 5/ 6
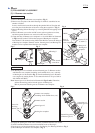
ASSEMBLING
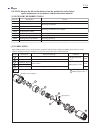
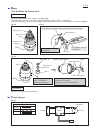
[3]-4. Bit Holder Section and Anvil
DISASSEMBLING
Raise this side (opposite to the expanded side) with index finger.
Ring spring 10
Expand Ring spring 10
with 1R291.
Slide the top of Bit sleeve
with thumb.
Bit sleeve
Bit sleeve
Hammer case
complete
Anvil
1R232
Ring spring 11
Fig. 14 Fig. 15
Steel ball 3 (2psc.)
Compression
spring 13
Flat washer 11
Sleeve
Hammer case complete
Nylon washer 20
Anvil
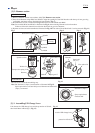
Anvil
1R232
Flat washer 12, Compression
spring 13 and Sleeve
are removed from Anvil.
Anvil and Nylon washer 20 are removed from
Hammer case complete.
Pay attention not to lose Steel ball 3.
Fig. 16
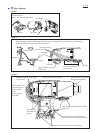
(1) Disassemble Hammer case complete. See Figs. 2 to 5.
(2) Put Hammer case complete on 1R232 to disassemble Ring spring 11 easily. See Fig. 14.
(4) Remove Ring spring 11 as illustrated in Fig. 15. Now Bit holder section can be disassembled as illustrated in Fig. 16.
Take the reverse of the disassembling step.
Circuit diagram
Fig. D-1
SwitchTerminal
White
DC motor
red marking
Red
Color index of lead wires' sheath
Black
+ +
- -
M1
M2
LED