


Instructions d’utilisation
Guide De Dépannage
Cessez l’utilisation de la cloueuse immédiatement en cas des problèmes suivants, car il y a
risque de blessures graves. Toutes réparations doivent être effectuées par un Technicien
Qualifié ou par un Centre De Service Autorisé.
!
AVERTISSEMENT
Symptôme Cause(s) possibles Mesures correctives
Fuite d’air à l’endroit de la soupape de la Joints torique endommagés dans le carter de Remplacer les joints toriques et vérifier le
gâchette la soupape de la gâchette fonctionnement du mécanisme de
déclenchement par contact
Fuite d’air entre le carter et l’avant
de l’appareil Joints toriques endommagés Remplacer les joints toriques
Amortisseur endommagé Remplacer l’amortisseur
Fuite d’air entre le carter et le capuchon Vis desserrées Serrer les vis
Joint d’étanchéité endommagé Remplacer le joint d’étanchéité
La cloueuse saute un clou pendant l’expulsion Amortisseur usé Remplacer l’amortisseur
Saleté dans la pièce avant Nettoyer la rainure du poussoir
Saleté ou dommage qui empêche le Nettoyer le chargeur
fonctionnement libre des clous ou du
poussoir dans le chargeur
Ressort de poussoir endommagé Remplacer le ressort
Circulation d’air insuffisante à la cloueuse Inspecter le raccord, le tuyau ou le compresseur
Joint torique du piston usé, etc. Remplacer les joints toriques. Graisser.
Joint torique de la soupape de gâchette Remplacer les joints toriques. Graisser.
endommagé
Fuites d’air Serrer les vis et raccords
Fuites du joint d’étanchéité du capuchon Remplacer le joint d’étanchéité
La cloueuse fonctionne lentement ou a une Graissage insuffisant de la cloueuse Graisser la cloueuse
perte de puissance Rupture du ressort du capuchon de cylindre Remplacer le ressort
Orifice d’échappement du capuchon obstrué Remplacer les pièces internes endommagées
Blocage des clous Guide du poussoir usé Remplacer le guide
Clous de mauvaise taille Utiliser les clous de taille recommandée
Clous courbés Remplacer les clous
Vis du chargeur ou de l’avant dessettées Serrer les vis
Poussoir colle dans la buse Poussoir endommagé Remplacer le poussoir
Clous mal chargés Faire la révision de la section Charger/
Décharger dans ce manuel
5-Fr
Attaches
Peut utiliser les clous de finition conçus pour les cloueuses de finition suivantes :
BT125SK-2 et BT200K-2 de Bostitch
MD
, NB0030 et NB0040 de Campbell Hausfeld
MD
, D51238K de DeWalt
MD
, T125-F18 et T200-F18
de Paslode
MD
, BN125 e BN200 de Porter Cable
MD
, et Finish Pro
MC
, 15 et 18 de Senco
MD
.
mance, la sûreté et la durabilité de l’ap-
pareil pourraient être compromises.
Lors d’une commande de pièces de
rechange ou de clous, préciser le
numéro de pièce.
Réparation de la cloueuse
Les réparations doivent être effectuées
par des techniciens qualifiés SEULEMENT.
Méthode d’assemblage pour
les joints d’étanchéité
Les pièces internes doivent être net-
toyées et graissées pendant la répara-
tion d’une cloueuse. Utiliser de la
graisse sur tous les joints toriques.
Chaque joint torique doit être enrobé
de graisse avant l’assemblage.
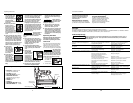
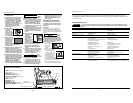
Latch
Magazine
Work contact
element (WCE)
Nail discharge Area
Trigger
Nail loading area
Cap exhaust
2
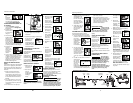
● Never place hands or
any other body parts
in the nail discharge
area of the nailer.
The nailer might eject
a fastener which
could result in death or serious per-
sonal injury.
● Never carry the nailer
by the air hose or
pull the hose to move
the nailer or a com-
pressor. Keep hoses
away from heat, oil
and sharp edges. Replace any hose
that is damaged, weak or worn.
Personal injury or tool damage could
occur.
● Always assume the nailer contains
nails. Never use the nailer as a toy.
Do not engage in horseplay. Always
keep others at a safe distance from
the work area in case of accidental
discharge of nails. Never point the
nailer at anyone. Accidental trigger-
ing of the nailer could result in
death or serious personal injury.
● Do not drive a
nail on top of
other nails. The
nail could glance
and cause death
or a serious punc-
ture wound.
● Do not operate or
allow anyone else
to operate the
nailer if any warn-
ings or warning
labels are not legi-
ble. Warnings or warning labels are
located on the nailer magazine and
body.
● Never leave the nailer unattended or
connected to an air compressor when
not in use. Serious personal injury
can occur if someone picks up and
uses the nailer without knowing the
correct way to operate the nailer.
● Do not drop or throw the tool.
Dropping or throwing the tool can
result in damage that will make the
tool unusable or unsafe. If the tool
has been dropped or thrown, exam-
ine the tool closely for bent, cracked
or broken parts and air leaks. STOP
and repair before using or serious
injury could occur.
Caution indicates a
potentially haz-
ardous situation which, if not avoided,
MAY result in minor or moderate
injury.
● Do not modify or alter the nailer or
any nailer parts. Do not use the nailer
if any shields or guards are removed
or altered. Do not use the nailer as a
hammer. Personal injury or tool
damage may occur.
● Avoid long extended periods of
work with the nailer. Stop using the
nailer if you feel pain in hands or
arms.
● Always check
that the Work
Contact Element
(WCE) is operat-
ing properly. A
nail could acci-
dentally be dri-
ven if the WCE
is not working properly. Personal
injury may occur (see "Checking the
Work Contact Element" Section.)
● Disconnect air supply and release
tension from the pusher before
!
CAUTION
attempting to clear jams because
fasteners can be ejected from the
front of the nailer. Personal injury
may occur.
Notice indicates
important informa-
tion, that if not followed, MAY cause
damage to equipment.
● Avoid using the nailer when the
magazine is empty. Accelerated
wear on the nailer may occur.
● Clean and check all air supply hoses
and fittings before connecting the
nailer to an air supply. Replace any
damaged or worn hoses or fittings.
Tool performance or durability may
be reduced.
Operating The Nailer
Read this manual and understand
all safety warnings and instruc-
tions before operating the nailer.
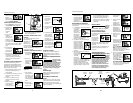
LUBRICATION
This nailer requires lubrication before
using the nailer for the first time and
before each use. If an inline oiler is
used, manual lubrication through the
air inlet is not required on a daily basis.
The work surface
can become dam-
aged by excessive lubrication. Proper
lubrication is the owner’s responsibil-
ity. Failure to lubricate the nailer prop-
erly will dramatically shorten the life
of the nailer and void the warranty.
1. Disconnect the
air supply from
the nailer to
add lubricant.
2. Turn the nailer so the air inlet is fac-
NOTICE
NOTICE
!
WARNING
Nailer Components and Specifications
Operating Instructions
• REQUIRES: 1.3 SCFM with 10
nails per minute @ 90 PSI
• AIR INLET: 1/4” NPT
• NAIL SIZE RANGE: 5/8” to 2”
• MAGAZINE CAPACITY:
100 Nails per load, 18 gauge
• WEIGHT: 3 lb, 3 oz
• LENGTH: 10”
• HEIGHT: 9”
• MAXIMUM PRESSURE: 100 PSI
• PRESSURE RANGE: 50 – 100 PSI