


ENGLISH
7
ENG
Metabo S-automatic safety clutch.
When the safety clutch responds, switch off the
machine immediately!
Avoid unintentional starting: always unlock the
trigger switch if the machine is unplugged or in the
event of a power failure.
For safety reasons, always use the side handle
supplied.
Do not grasp the rotating tool!
Remove chips and similar matter only with the
machine at standstill.
Wear ear protectors when using the tool for
extended period s.
Prolonged exposure to high
intensity noise can cause hearing loss.
Caution with hard screwdriving (driving of screws
with either a metric or an imperial thread into steel).
The head of the screw may rip off or high restoring
torques may be incurred at the handle.
SYMBOLS ON THE TOOL:
.......Class II Construction
V...........volts
A...........amperes
Hz.........hertz
.../min...revolutions per minute
~...........alternating current
n
0
.........no load speed
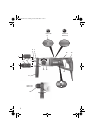
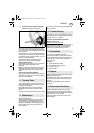
See page 3.
1
Keyless chuck *
2
SDS chuck *
3
Tool lock *
4
Keyless chuck sleeve *
5
Chuck lock *
6
Spindle *
7
Depth stop
8
Electronic signal indicator
9
Rotation selector switch
10
Lock button
11
Trigger
12
Stop
13
Control knob
14
Side handle
15
SDS chuck *
*
depending on machine type
Exchangeable chuck
(not
KHE-D 24,
BHE-D 24):
With a simple operation and without the need for
extra tools the SDS chuck is exchanged against
the keyless chuck.
Single-knob control
With only a single control knob the operating mode
(drilling, hammer drilling, chiselling, depending on
the model) is selected.
Rotary stop:
(KHE-D 28,
KHE-D 24
):
By turning the rotation off chiselling can be done.
Metabo S-automatic safety clutch:
If the insertion tool jams or hooks, the power flow
to the engine will be restricted. Because of the high
power which then arises, always hold the machine
with both hands on the handles, stand safely, and
concentrate on your work.
Auto-stop carbon brushes
If the brushes are completely worn, the machine
switches off automatically.
With VTC electronics: A LED warns before the
brushes are completely worn.
Before plugging in check to see that the
rated mains voltage and mains
frequency, as stated on the rating label,
match with your power supply.
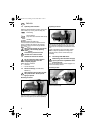
6.1 Side handle installation
For safety reasons, always use the side
handle supplied.
Open the clamping ring by turning the side handle
(14) counter-clockwise. Place the side handle onto
the machine's collar. Insert the depth stop (7).
Tighten the side handle in the required angle
depending on the task at hand.
7.1 Depth Stop Setting
Loosen the side handle (14). Set depth stop (7) to
the desired drilling depth and retighten the side
handle.
7.2 Switching on/off
To start the machine, press the trigger (11).
The speed can be changed at the trigger.
This machine has an electronic soft start.
For continuous operation the trigger can be locked
with the lock button (10). To stop the machine,
press the trigger again.
If switched on continuously, the machine
continues running if it is jerked out of
your hands. Therefore, always hold the
machine with both hands on the handles, stand
safely, and concentrate on your work.
4 Functional Description
5 Special Product Features
6 Assembly, Initial Use
7 Operation
6950.book Seite 7 Montag, 29. November 2004 12:54 12