


OM-6611 Page 11
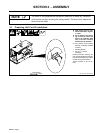
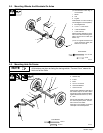
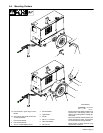
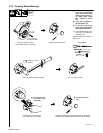
3-7. Mounting Welding Generator
This trailer is not compatible with equipment made prior to Serial No. LB033208.
NOTE
Y Do not use lifting eye to lift unit dur-
ing this procedure. Mounting the
unit requires removal of center up-
right hardware and lifting eye will not
safely support unit with hardware
removed.
Y Use equipment of adequate capacity
to lift the generator.
Y Support front of trailer with jack.
Support rear of trailer with blocks.
Block wheels.
Y If trailer is not installed on vehicle,
use trailer jack to obtain desired
height and to support tongue weight
while installing welding generator.
Y Install welding generator on trailer
with engine end toward hitch end of
trailer.
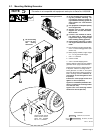
. Use remaining mounting bracket hard-
ware to mount welding generator (see
Section 3-3).
. When properly installed, tongue weight
is 7 − 8 % of gross trailer weight.
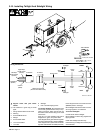
1 5/8-11 x 1-1/2 Screw
2 5/8 ID Lock Nut
3 3/8-16 x 3/4 Self Tapping Screw
Remove bottom screws securing welding
generator center upright. Discard screws.
Install mounting screws in base far enough
to tap holes. Remove mounting screws.
Place generator on trailer so front panel
faces rear. Align holes in base with holes in
trailer mounting brackets. Install 3/8 in.
self-tapping screws and tighten to 30 ft
lb (41 N
.
m).
Install 5/8 in. center upright screws and
tighten to 150 ft lb (203 N
.
m).
Tighten 1/2 in hardware (installed in Sec-
tion 3-2) on bottom of mounting bracket
to 75 ft lb (101 N
.
m).
Tighten 5/8 in. front mounting bracket
hardware to 150 ft lb (203 N
.
m).
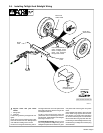
Tools Needed:
1/2, 9/16, 3/4, 15/16 in
802 817 / 802 818
9/16, 3/4, 15/16 in
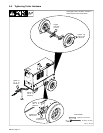
Recommended Lifting Procedure
Y Do not use lifting
eye to lift unit.
See warning
statements.
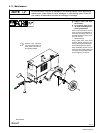
2
1
3
Remove center upright
bottom screw and re-
place with supplied
5/8-11 x 1-1/2 Screw.
3