


OM-6611 Page 14
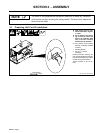
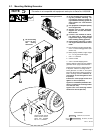
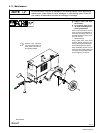
3-10. Installing Taillight And Sidelight Wiring
802 074-A / 802 818
LEFT
RIGHT
To TrailerTo Vehicle
Sidelight
Ground
(White)
Taillights
(Brown)
Right Stop/
Signal Lamps
(Green)
Taillights
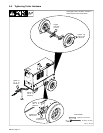
Tools Needed:
7/16, 9/16, 10 mm
Wiring Connections:
Brown Lead
1
4
Green
Lead
Brown Lead
Yellow
Lead
Sidelight
White Ground Lead
(Ground To Trailer Frame)
Left Stop/
Signal Lamps
(Yellow)
8
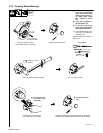
Y Support trailer with jack. Block
wheels.
. Use hardware in green bag to install
lights.
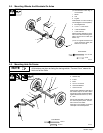
1 Wiring Harness White Ground Lead
2 Sleeving
3 3/4 Sheet Metal Screw
4 Taillight
5 License Plate Holder
6 1/4 ID Lock Washer
7 1/4 ID Nut
8 Sidelight
9 8-32 x 5/8 Self-Tapping Screw
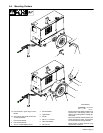
To connect taillights: Strip insulation from
end of white ground lead and crimp on sup-
plied ring terminal. Attach ground lead ring
terminal to chain bracket using 3/4 in sheet
metal screw.
Strip 1/2 in (12.7 mm) insulation from ends of
taillight brown, green, and yellow leads.
Insert stripped end of green lead into right tail-
light hole marked STOP & TURN (GREEN).
Insert stripped end of yellow lead into left tail-
light hole marked STOP & TURN (YELLOW).
Insert stripped end of brown leads into TAIL
(BROWN) holes in each light.
Mount taillights and license holder on brack-
ets using supplied 1/4 in hardware.
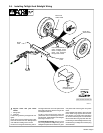
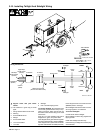
To connect sidelights:
Connect brown lead to sidelight.
Mount sidelight on frame using supplied self-
tapping screws.
Install other sidelight the same way.
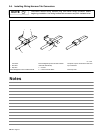
Install sleeving on taillight and harness plug
electrical leads.
2
3
2
1/4 in
5
Ta b
Connector
Ta b
Connector
Short
Lead
Short
Lead
9
7
6