


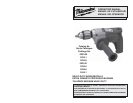

1110
APPLICATIONS
Selecting Bits
When selecting a bit, use the right type for
your job. For best performance, always
use sharp bits.
Drilling in Wood, Composition Materi-
als and Plastic
When drilling in wood, composition materi-
als and plastic, start the drill slowly, gradu-
ally increasing speed as you drill. When
using twist drill bits, pull the bit out of the
hole frequently to clear chips from the bit
flutes. Use low speeds for plastics with a
low melting point.
Drilling in Masonry
When drilling in masonry, use high speed
carbide-tipped bits. Drilling soft masonry
materials such as cinder block requires little
pressure. Hard materials like concrete re-
quire more pressure. A smooth, even flow
of dust indicates the proper drilling rate.
Do not let the bit spin in the hole without
cutting. Do not use water to settle dust or
to cool bit. Both actions will damage the
carbide.
Drilling in Metal
When drilling in metal, use high speed steel
twist drills or hole saws. Use slow speeds
for hard metals and high speeds for softer
metals. Lubricate drill bits with cutting oil
when drilling in iron or steel. Use a coolant
when drilling in nonferrous metals such as
copper, brass or aluminum. Back the mate-
rial to prevent binding and distortion on
breakthrough.
NR = Not recommended
To reduce the risk of injury,
always wear eye protection.
WARNING!
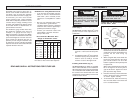
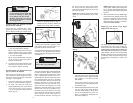
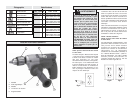
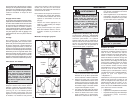
Using Forward/Reverse Switch (Fig. 10)
1. For forward (clockwise) rotation, push
the forward/reverse switch to FWD as
shown.
2. For reverse (counterclockwise) rota-
tion, push the forward/reverse switch
to REV as shown. Although an inter-
lock prevents reversing the tool while
the motor is running, allow it to come to
a full stop before reversing.
Locking Trigger (Fig. 11)
The lock button holds the trigger in the ON
position for continuous full speed use.
To reduce the risk of injury, keep
hands and cord away from the bit
and all moving parts.
WARNING!
OPERATION
Forward
Fig. 10
Trigger
Reverse
Lock
button
Fig. 11
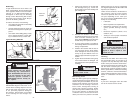
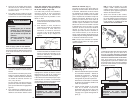
Drilling
1. Before drilling, be sure the workpiece
is clamped securely. Use backing ma-
terial to prevent damage to the work-
piece during breakthrough.
2. When starting a hole, place the drill bit
on the work surface and apply firm
pressure. Begin drilling at a slow speed,
gradually increasing the speed as you
drill.
3. Always apply pressure in line with the
bit. Use enough pressure to keep the
drill biting, but do not push hard enough
to stall the motor.
4. Reduce pressure and ease the bit
through the last part of the hole. While
the tool is still running, pull the bit out of
the hole to prevent jamming.
Stalling
If the tool seems as if it is about to stall,
maintain a firm grip and reduce pressure
slightly to allow the bit to regain speed. If
the tool does stall, release the trigger im-
mediately. Reverse the motor, remove the
bit from the work and start again. Do not
pull the trigger on and off in an attempt to
start a stalled drill. This can damage the
drill.
Starting, Stopping and Controlling
Speed
1. To start the tool, pull the trigger.
2. To stop the tool, release the trigger.
3. To vary the drilling speed, simply in-
crease or decrease pressure on the
trigger. The further the trigger is pulled,
the greater the speed.
To reduce the risk of explosion,
electric shock and property
damage, always check the work
area for hidden pipes and wires
before drilling.
WARNING!
1. To lock the trigger, hold the lock button
in while pulling the trigger. Release the
trigger.
2. To unlock the trigger, pull the trigger
and release. The lock button will pop
out.
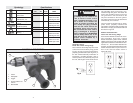
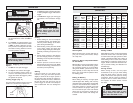
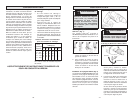
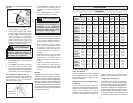
CAPACITIES
Cat.
No.
0233-20
0234-1
RAD low
RAD high
0234-6
RAD low
RAD high
0235-21
0235-6
0236-6
RAD low
RAD high
0244-1
RAD low
RAD high
Ship
Auger
Bits
N R
1-1/4"
1-1/2"
1"
1-1/4"
1-1/2"
1"
1-1/4"
1-1/4"
1-1/4"
1-1/2"
1"
1-1/2"
1-1/2"
1-1/4"
Flat
Boring
Bits
1"
1-1/2"
1-1/2"
1-1/2"
1-1/2"
1-1/2"
1-1/2"
1-1/2"
1-1/2"
1-1/2"
1-1/2"
1-1/2"
1-1/2"
1-1/2"
1-1/2"
Auger
Bits
N R
1-1/2"
1-1/2"
1-1/8"
1-1/2"
1-1/2"
1-1/8"
1-1/2"
1-1/2"
1-1/2"
1-1/2"
1-1/8"
1-1/2"
1-1/2"
1-1/2"
Selfeed
Bits
N R
2"
2-1/4"
1-1/2"
2"
2-1/4"
1-1/2"
2"
2"
2"
2-1/4"
1-1/2"
2-1/4"
2-9/16"
1-3/4"
Twist
Drill
3/8"
1/2"
1/2"
1/2"
1/2"
1/2"
1/2"
1/2"
1/2"
1/2"
1/2"
1/2"
1/2"
1/2"
1/2"
Hole
Saws
1-3/4"
4"
4-1/2"
2-3/4"
4"
4-1/2"
2-3/4"
4"
4"
4"
4-1/2"
2-3/4"
4-1/2"
5"
3-1/4"
Hole
Saws
1"
2"
2-1/8"
1-1/2"
2"
2-1/8"
1-1/2"
2"
2"
2"
2-1/8"
1-1/2"
2-1/4"
2-1/4"
1-3/4"
Carbide-
Tipped
Bits
3/8"
1/2"
9/16"
7/16"
1/2"
9/16"
7/16"
1/2"
1/2"
1/2"
9/16"
7/16"
9/16"
5/8"
1/2"
Wood Steel Masonry
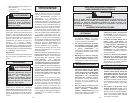
High rotational force. To reduce the
risk of injury, always hold or brace
secrely. Always use side handle on
tools rated 1200 RPM or less.
WARNING!
Driving Screws
When driving screws, use the proper
screwdriver bit for your job. After drilling
pilot and shank holes, start the screw
slowly and increase the speed as driving
progresses. Set the screw by slowing to
a stop. Do not run screws down at exces-
sive speeds. To remove screws, reverse
the motor.