


18
ACCESSORIES
For a complete listing of accessories refer to your
Milwaukee Electric Tool catalog or go online
to www.milwaukeetool.com. To obtain a catalog,
contact your local distributor or service center.
WARNING Alwaysremovebatterypack
beforechangingorremovingaccessories.
Onlyuseaccessoriesspecicallyrecommend-
edforthistool.Othersmaybehazardous.
MaintainingTool
Keep your tool, battery pack and charger in good
repair by adopting a regular maintenance program.
After six months to one year, depending on use,
return the tool, battery pack and charger to a
Milwaukee service facility for:
• Lubrication
• Mechanical inspection and cleaning (gears,
spindles, bearings, housing, etc.)
• Electrical inspection (battery pack, charger, motor)
• Testing to assure proper mechanical and electrical
operation
If the tool does not start or operate at full power
with a fully charged battery pack, clean the contacts
on the battery pack. If the tool still does not work
properly, return the tool, charger and battery pack,
to a Milwaukee service facility for repairs.
MAINTENANCE
Cleaning
Clean dust and debris from charger and tool vents.
Keep tool handles clean, dry and free of oil or grease.
Use only mild soap and a damp cloth to clean the
tool, battery pack and charger since certain cleaning
agents and solvents are harmful to plastics and other
insulated parts. Some of these include gasoline,
turpentine, lacquer thinner, paint thinner, chlorinated
cleaning solvents, ammonia and household deter-
gents containing ammonia. Never use ammable or
combustible solvents around tools.
Repairs
For repairs, return the tool, battery pack and char-
ger to the nearest service center.
WARNING Toreducetheriskofper-
sonalinjuryanddamage,neverimmerseyour
tool,batterypackorchargerinliquidorallow
aliquidtoowinsidethem.
WARNING Toreducetheriskofinjury,
alwaysunplugthechargerandremovethe
batterypackfromthechargerortoolbefore
performinganymaintenance.Neverdisas-
semblethetool,batterypackorcharger.
ContactaMILWAUKEEservicefacilityfor
ALLrepairs.
APPLICATIONS
WARNING Toreducetheriskofelectric
shock,checkworkareaforhiddenpipesand
wiresbeforedrillingordrivingscrews.
DrillinginWood,CompositionMaterialsand
Plastic
Always use sharp bits. When using twist drill bits,
pull the bit out of the hole frequently to clear chips
from the bit utes. To reduce the chance of splinter-
ing, back work with a piece of scrap wood. Select
low speeds for plastics with a low melting point.
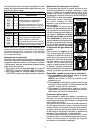
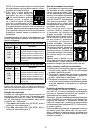
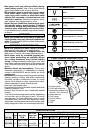
DrivingScrews
Drill a pilot hole when driving screws into thick or
hard materials. Set the clutch adjusting ring to the
proper position and set the speed to low. Use the
proper style and size screwdriver bit for the type
of screw you are using.
With the screwdriver bit in the screw, place the
tip of the screw on the workpiece and apply rm
pressure before pulling the trigger. Screws can
be removed by placing the control switch in the
“Reverse” position.
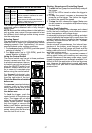
LockingtheScrewdriverBit
When the tool is off, the screwdriver bit auto-
matically locks in place allowing you to use the
screwdriver manually. Do this to tighten screws
that require more torque than the driver is capable
of delivering, when conrming the tightness of a
screw or when loosening an extremely tight screw.