


8
9
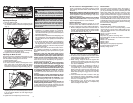
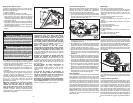
Plunge Cutting
Plunge cuts are made in the middle of the work-
piece when it can not be cut from an edge. We rec-
ommend using a Sawzall
®
reciprocating saw or jig
saw for this type of cut. However, if you must use a
circular saw to make a plunge cut, USE EXTREME
CAUTION. To maintain control of the saw during
plunge cutting, keep both hands on the saw.
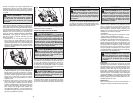
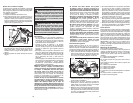
1. Beginning at a corner, line up the sight line with
your cutting line. Tilt the saw forward, fi rmly fi xing
the front of the shoe on the workpiece (Fig. 8).
The blade should be just above cutting line, but
not touching it. Raise the lower guard using the
lower guard lever.
WARNING To reduce the risk of electric
shock, check work area for hidden pipes and
wires before making plunge cuts.
Fig. 8
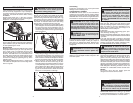
2. To start the saw, push the lock-off button down
while pulling the trigger. Allow the motor to reach
full speed before beginning cut. Using the front
of the shoe as a hinge point, gradually lower the
back end of the saw into the workpiece. Release
the lower guard lever and grasp the front handle.
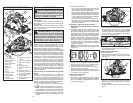
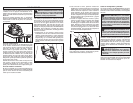
3. When the shoe rests fl at against workpiece,
advance the saw to the far corner (Fig. 9). Re-
lease the trigger and allow the blade to come to
a complete stop before removing it from work-
piece. Repeat the above steps for each side of
the opening. Use a Sawzall
®
reciprocating saw,
jig saw or small hand saw to fi nish the corners
if they are not completely cut through.
Fig. 9
ACCESSORIES
For a complete listing of accessories refer to your
MILWAUKEE Electric Tool catalog or go online
to www.milwaukeetool.com. To obtain a catalog,
contact your local distributor or service center.
WARNING Always remove battery pack
before changing or removing accessories.
Only use accessories specifi cally recommend-
ed for this tool. Others may be hazardous.
Maintaining Tool
Keep your tool, battery pack and charger in good
repair by adopting a regular maintenance program.
After six months to one year, depending on use,
return the tool, battery pack and charger to A
MILWAUKEE service facility for:
• Lubrication
• Mechanical inspection and cleaning (gears, spin-
dles, bearings, housing, etc.)
• Electrical inspection (battery pack, charger, motor)
• Testing to assure proper mechanical and electrical
operation
If the tool does not start or operate at full power
with a fully charged battery pack, clean the contacts
on the battery pack. If the tool still does not work
properly, return the tool, charger and battery pack,
to a MILWAUKEE service facility for repairs.
MAINTENANCE
Cleaning
Clean dust and debris from charger and tool vents.
Keep tool handles clean, dry and free of oil or
grease. Use only mild soap and a damp cloth to
clean the tool, battery pack and charger since certain
cleaning agents and solvents are harmful to plastics
and other insulated parts. Some of these include
gasoline, turpentine, lacquer thinner, paint thinner,
chlorinated cleaning solvents, ammonia and house-
hold detergents containing ammonia. Never use
fl ammable or combustible solvents around tools.
Repairs
For repairs, return the tool, battery pack and
charger to the nearest service center.
WARNING To reduce the risk of per-
sonal injury and damage, never immerse your
tool, battery pack or charger in liquid or allow
a liquid to fl ow inside them.
WARNING To reduce the risk of injury,
always unplug the charger and remove the
battery pack from the charger or tool before
performing any maintenance. Never disas-
semble the tool, battery pack or charger.
Contact a MILWAUKEE service facility for
ALL repairs.
When cutting masonry, use a diamond blade. Make
successive passes at depths of less than 1/4" to
achieve the desired depth. Cutting at a depth of
more than 1/4" will damage wheel. Remove bat-
tery pack and frequently clean dust from air vents
and guards.
When cutting metal, use a metal cutting blade. Set
depth of cut to full depth. Protect everyone in the
area from sparks.
WARNING Dust, chips, and grit can
cause guard to hang up at any time. If saw
is used to cut masonry or metal, reserve and
mark it for that purpose only and return it to
a MILWAUKEE service facility for cleaning
and testing before using it for wood cutting.
WARNING Only use accessories with
maximum speed rating at least as high as
nameplate RPM of tool.
WARNING Do not use tool for cutting
metal near fl ammable material. Sparks may
cause fi re.
Overloading
Continuous overloading may cause permanent
damage to tool or battery pack.
Cutting Masonry and Metal
MILWAUKEE circular saws are not intended for
continuous use in cutting metal or masonry. When
cutting these materials, use the correct blade. MIL-
WAUKEE does not recommend using bonded abra-
sive wheels on circular saws for any application.
APPLICATIONS
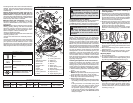
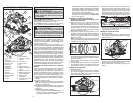
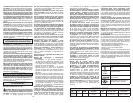
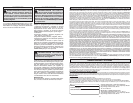
Cutting Large Panels
Large panels and long boards sag or bend if they
are not correctly supported. If you attempt to
cut without leveling and properly supporting the
workpiece, the blade will tend to bind, causing
KICKBACK.
Support large panels (Fig. 7). Be sure to set the
depth of the cut so that you only cut through the
workpiece, not through the supports.
Fig. 7
Cross-Cutting Wood
Cross-cutting is cutting across the grain. Select the
proper blade for your job. Advance the saw slowly
to avoid splintering the wood.
Ripping Wood
Ripping is cutting lengthwise with the grain. Select
the proper blade for your job. Use a rip fence for
rips 4" wide or less. To install the rip fence, slide
the bar through the rip fence slot in either side of
the shoe. The width of the cut is the distance from
the inside of the blade to the inside edge of the rip
fence. Adjust the rip fence for the desired width,
and lock the setting by tightening the rip fence
adjusting knob.
When ripping widths greater than 4", clamp or tack
1/2" lumber to workpiece and use the edge of the
shoe as a guide.