


12 13
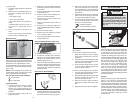
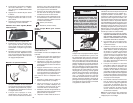
1. Insert the tap into the chuck. TIGHTEN
THE CHUCK SO THAT THE CHUCK
JAWS GRIP THE ROUND PORTION
OF THE SHANK AND NOT THE FLATS
OF THE TAP.
2. For tapping existing holes, align the
tap so it is centered with the hole and
reenergize the base.
3. Lubricate the tap and hole and lower the
tap onto the work surface. Turn the drill
speed control to the slowest setting and
push the “Drill Fwd” button (“Drill Rev”
for the left hand threads) to start the drill
motor. Adjust the speed control knob so
the tap turns slowly and smoothly into
the hole.
4. When using smaller taps, reverse the
motor as soon as the tap breaks through
the hole. With large taps, reverse the
motor as soon as the fi rst full thread is
exposed, the motor does not have to be
stopped before changing directions.
5. Reverse the motor to slowly withdraw
the tap from the hole. Maintain light
pressure on the handle to compensate
for the weight of the drill motor on the
tap. As soon as the tap comes out of the
hole, raise the motor and tap clear of the
workpiece.
NOTE: Only the low speed shift setting
on the 2-speed drill is recommended for
tapping.
Using Twist Drills
When preparing to drill, align the bit with
the area to be drilled. When proper align-
ment is established, energize the magnet
and start the drill motor. A pilot hole is
recommended for drilling holes larger than
1/2" in diameter.
When drilling, apply only enough force to
produce a curled chip. Applying too little
force will result in small broken chips and
increased drilling time. Applying too much
force will cause overheating of the bit result-
ing in short bit life. Overheating of the bit can
be noticed when drill bit and chips turn brown
or blue. Excessive force can cause the drill
to slow down to a point where drilling time
will increase. The use of cutting lubricants
will reduce drilling heat and increase drill
bit life.
Using MILWAUKEE STEEL HAWG™
CUTTERS
MILWAUKEE STEEL HAWG™ CUTTERS
cut an annular ring around the edge of the
hole leaving the center “slug” intact. This
greatly reduces the time, power and drilling
force required. The carbide teeth also leave
a fi nished hole that does not require reaming.
These cutters are designed for use with an
electromagnetic or industrial drill press.
• Do not use these cutters in hand held
tools.
• Center pin is spring loaded. Provide
protection from ejected slug for people
and property below drilling area.
• Do not remove cutter from arbor unless
slug is removed. Slug may be ejected
unexpectedly.
• Keep pump bottle and hose away from
moving parts.
• Use pliers to remove chips from bit and
arbor only after motor has stopped.
• Avoid contact with the carbide tips.
• Periodically inspect the carbide tips for
loose or cracked tips. DO NOT USE
carbide tips with cracked or loose tips.
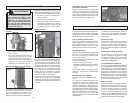
WARNING
• These bits require the use of HAWG
WASH™ cutting fl uid for extended
life. Do not use cutting fl uid in an
overhead or any other position that
allows cutting fl uid to enter motor
or switch enclosure.
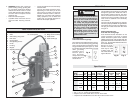
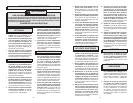
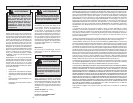
• Wet connections are shock hazards.
Prevent cutting fl uid from traveling
along cord and contacting the out-
let, extension cord connections or
tool plug. Each time tool is plugged
in, elevate extension cord or gang
box connections and arrange a drip
loop (See Fig. 12). If plug or connec-
tions get wet, turn power off to outlet
before unplugging tool.
Attaching MILWAUKEE STEEL HAWG™
CUTTERS
See the information supplied with your
arbor.
Cutting Procedure
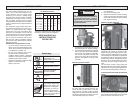
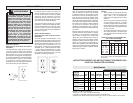
1. Refer to the chart supplied with the arbor
to determine the proper drill rotating
speed for the type of material and cutter
diameter. When using this chart, use
the upper end of the range for softer
materials and the lower end for harder
materials. Set the drill rotating speed to
the recommended speed.
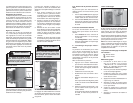
2. Position the workpiece or tool so that
the center pin is directly over the desired
drilling location.
3. The use of HAWG WASH™ cutting fl uid
is required for long life of these cutters
(see "Lubrication"). Attach the hose to
the oil fi tting on the side of the arbor and
to your lubricant reservoir.
4. Swing the arbor arm in the direction
of the spindle rotation until it comes in
contact with the side of the drill motor or
drill press.
5. Start the drill motor.
6. Cutting fl uid will not fl ow freely until the
center pin is depressed slightly. Move
the cutter towards the material until
the center pin is depressed slightly and
begin pumping cutting fl uid.
Fig. 12
WARNING
Always use well maintained equip-
ment with minimum spindle run out.
7. When feeding the cutter into the materi-
al, use only enough pressure to produce
effi cient cutting without overloading the
tool or cutter. Because STEEL HAWG™
CUTTERS have multiple cutting edges,
they require considerably less down-
ward pressure than ordinary twist drills.
STEEL HAWG™ CUTTERS work best
at their recommended drill rotating
speed and with moderate pressure.
Excessive pressure will only slow the
operation and damage the cutter. Use
less feed pressure when slotting or
notching because there is less support
for the cutting edges in these situa-
tions.
8. Avoid raising the cutter before the cut
is complete. Keep constant pressure
throughout the entire operation to
prevent chips and cuttings from falling
under the cutting edges. A loose cutting
under the cutter can make cutting dif-
fi cult or impossible.
9. When the cut is completed, stop pump-
ing cutting fl uid, and withdraw the cutter
while the drill motor is still rotating.
10. Turn the drill motor off.
11. When the drill has stopped, use a pli-
ers to remove cuttings from the bit and
arbor. Use care to avoid damaging the
carbide teeth.
12. The center pin is spring loaded and
should eject the slug when the cut is
completed. Provide protection from fall-
ing slugs for people or property below.
Lubrication
A continuous fl ow of lubricant is required with
these cutters. MILWAUKEE HAWG WASH™
(cutting fl uid) is recommended for most ap-
plications. It is available in a case of twelve
16 oz. bottles of concentrate, Cat. No. 49-
32-0081, which will make 1 gal. of lubricant
per bottle. Failure to use the lubricant prop-
erly will cause cutter damage. When cutting
with STEEL HAWG™ CUTTERS, supply a
continuous fl ow of cutting fl uid to the arbor.
When notching or slotting, the lubricant sys-
tem may not supply enough lubricant to the
cutting area. In these situations, the cutting
fl uid should be applied directly to the area
being cut. Alternative lubricants introduce
different cooling and lubricating reactions.
The operator is responsible for the applica-
tion of lubricants other than HAWG WASH™
cutting fl uid.