


4 5
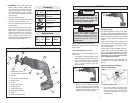
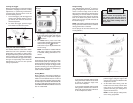
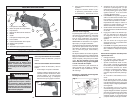
FUNCTIONAL DESCRIPTION
1. Orbit control switch
2. Handle adjustment button
3. Handle
4. Battery pack release buttons
5. Battery pack
6. Trigger
7. Trigger lock switch
8. Insulating boot
9. Shoe release lever
10. Adjustable pivot shoe
11. Blade
12. Quik-Lok
®
blade clamp
Strokes per
Minute
0 - 2700
Cat.
No.
6514-20
Volts
DC
18
Specifi cations
Length of
Stroke
3/4"
Symbology
Volts Direct Current
No Load Strokes
per Minute
Underwriters
Laboratories, Inc.
Orbital Cut
Straight Cut
6
4
7
5
9
2
12
11
10
1
3
8
5. WARNING! Some dust created by
power sanding, sawing, grinding, drill-
ing, and other construction activities
contains chemicals known to cause
cancer, birth defects or other reproduc-
tive harm. Some examples of these
chemicals are:
• lead from lead-based paint
• crystalline silica from bricks and cement
and other masonry products, and
• arsenic and chromium from chemically-
treated lumber.
Your risk from these exposures varies,
depending on how often you do this
type of work. To reduce your exposure
to these chemicals: work in a well ven-
tilated area, and work with approved
safety equipment, such as those dust
masks that are specifi cally designed to
fi lter out microscopic particles.
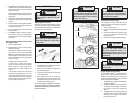
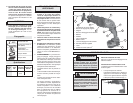
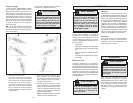
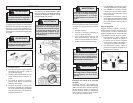
2. For optimum weight distribution and
balance, insert the battery pack from
the back by pressing in the release
buttons and sliding the battery pack into
the body of the tool (Fig. 2). Insert the
battery pack until clamp engages.
Selecting a Blade
The Quik-Lok
®
Blade Clamp can be used
with all 1/2" shank universal Sawzall
®
blades.
Use MILWAUKEE High Performance Super
Sawzall
®
blades for best performance. When
selecting a blade, choose the right type and
length.
Many types of blades are available for a
variety of applications: cutting metal, wood,
nail-embedded wood, scroll cutting, rough-
ing-in, and contours.
Many lengths are also available. Choose a
length long enough to extend beyond the
shoe and your work throughout the stroke.
Do not use blades less than 3-1/2" long
since they will not extend beyond the
shoe throughout the stroke.
For best performance and longest life, see
"Accessories" to select the best blade for
the job.
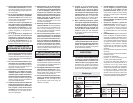
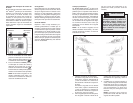
Installing and Removing Blades
Quik-Lok
®
Blade Clamp
Collar
Fig. 3
Blade
Fig. 2
1. Remove battery pack.
2. Be sure the spindle and blade clamp
areas are clean. Metal chips and saw-
dust may prevent the Quik-Lok
®
Blade
Clamp from clamping securely (see
"Maintenance").
ASSEMBLY
Removing Battery Pack from Tool
Push in the release buttons and remove the
battery pack.
Inserting Battery Pack into Tool
Battery pack can be inserted into the tool
in two ways.
1. For working in restricted spaces, insert
the battery pack from the front by press-
ing in the release buttons and sliding
battery pack into the body of the tool
(Fig. 1). Insert the battery pack until
clamp engages.
Fig. 1
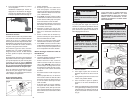
WARNING
Always lock trigger or remove
battery pack before changing or
removing accessories. Only use
accessories specifically recom-
mended for this tool. Others may
be hazardous.
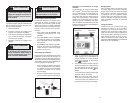
WARNING
Recharge only with the charger
specifi ed for the battery pack. For
specifi c charging instructions, read
the operator's manual supplied with
your charger and battery pack.