


page 6
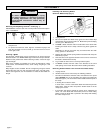
WARNING!
TOOL ASSEMBLY
To reduce the risk of injury, always unplug
tool before attaching or removing accessories
or making adjustments. Use only specifically
recommended accessories. Others may be
hazardous.
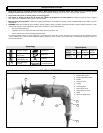
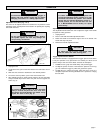
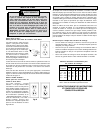
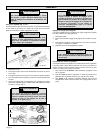
Removing and Replacing Quik-Lok
®
Cords (Fig. 1)
MILWAUKEE's exclusive Quik-Lok
®
Cords provide instant field replace-
ment or substitution.
Fig. 1
1. To remove the Quik-Lok
®
Cord, turn the cord nut 1/4 turn to the left
and pull it out.
2. To replace the Quik-Lok
®
Cord, align the connector keyways and
push the connector in as far as it will go. Turn the cord nut 1/4 turn
to the right to lock.
Selecting a Blade
The Quik-Lok
®
Blade Clamp can be used with all 1/2" shank universal
Sawzall
®
blades. Use MILWAUKEE High Performance Super Sawzall
®
blades for best performance. When selecting a blade, choose the right
type and length.
Many types of blades are available for a variety of applications: cutting
metal, wood, nail-embedded wood, scroll cutting, roughing-in, and
contours.
Many lengths are also available. Choose a length long enough to extend
beyond the shoe and your work throughout the stroke. For best perfor-
mance and longest life, see "Accessories" to select the best blade for
the job.
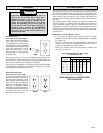
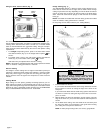
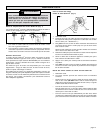
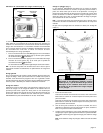
Installing and Removing Blades
Quik-Lok
®
Blade Clamp (Fig. 2)
1. Unplug the tool.
2. Be sure the spindle and blade clamp areas are clean. Metal chips
and sawdust may prevent the Quik-Lok
®
Blade Clamp from clamping
securely (see "Maintenance").
3. To install a blade, twist the collar in the direction of the arrow while
inserting the blade into the clamp until the tang butts against the
collar.
Depending on the job, the blade may be inserted with the teeth
facing upward or downward.
4. Release the collar and the spring loaded mechanism will clamp the
blade firmly in place.
5. Twist the collar in the opposite direction of the arrow to ensure that
the blade is locked into the clamp.
6. Tug on blade to make sure it is securely locked in place.
7. To remove a blade, twist the collar in the direction of the arrow
while pulling on the blade. Be careful when handling hot blades.
Removing Broken Blades from the Quik-Lok
®
Blade Clamp
1. Unplug the tool.
2. Broken blades can be removed by the following methods.
• Point the tool downward, twist the collar, and shake the tool up and
down (DO NOT turn on the tool while your fingers are holding the
blade clamp open). The shank of the broken blade should drop out of
the clamp.
• If shaking the tool doesn't work...
In most cases, a corner of the broken blade will extend beyond the
blade clamp. Twist the collar and pull the broken blade out of the
clamp by this corner.
• If the broken stub doesn't extend far enough to be grabbed by its
corner, use a thin blade with small teeth (such as a metal cutting
blade) to hook the blade that is jammed in the clamp while twisting
the collar and pull it out.
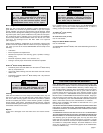
Collar
Fig. 2
Blade