


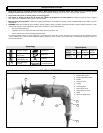
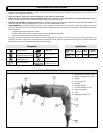

page 8
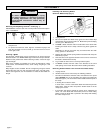
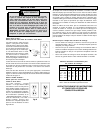
Using the Orbit Control Switch (Fig. 6)
WARNING!
To reduce the risk of explosion, electric shock
and property damage, always check the work
area for hidden gas pipes, electrical wires or
water pipes when making blind or plunge cuts.
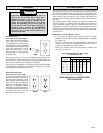
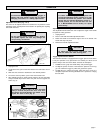
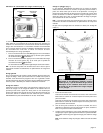
Fig. 7
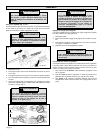
Fig. 6
Straight
action
Orbital
action
The Sawzall
®
Hatchet
TM
orbit control switch allows the tool to be oper-
ated in straight reciprocating (non orbital) or orbital action. Straight recip-
rocating action should be used when a smooth cut is needed. Orbital
action is recommended for fast, aggressive cutting. The type of recipro-
cating action should be determined by the user for their specific cutting
requirements.
1. For straight reciprocating action, press in the orbit control switch
and slide the switch (Fig. 6) so the straight action symbol is
shown.
2. For orbital action, press in the orbit control switch and slide the
switch (Fig. 6) so the orbital action symbol is shown.
Orbit action may be adjusted when the tool is running.
NOTE: If the blade is installed with the teeth facing upward and orbital
action is selected, cutting performance is reduced.
General Cutting
For straight or contour cutting from an edge, line the blade up with your
cutting line. Before the blade contacts the workpiece, grasp the handle
firmly and pull the trigger. Then guide the tool along your cutting line.
Always hold the shoe flat against the workpiece to avoid excessive
vibration.
Cutting Metals
Begin cutting at a slow speed, gradually increasing speed as you cut.
When cutting into metals or hard materials that can not be cut from an
edge, drill a starting hole larger than the widest part of the blade. Extend
blade life by using a solid blade cutting lubricant such as MILWAUKEE
Easy-Cut Sawzall Blade Lubricant Cat. No. 49-08-4206.
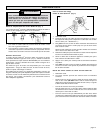
Plunge Cutting (Fig. 7)
Your MILWAUKEE Sawzall
®
is ideal for plunge cutting directly into sur-
faces that can not be cut from an edge, such as walls or floors. Plunge
cutting may be done two ways depending on how the blade is inserted.
Column A shows how to plunge cut with the teeth of the blade facing
down. Column B shows how to plunge cut with the teeth of the blade
facing up.
NOTE: If the blade is installed with the teeth facing upward and orbital
action is selected, cutting performance is reduced.
Do not plunge cut into metal surfaces (see “Cutting Metals”).
1. Insert the blade into the tool.
If you inserted the blade with the teeth facing downward, hold the
tool as shown in Column A, resting the edge of the shoe on the
workpiece.
If you inserted the blade with the teeth facing upward, hold the tool
as shown in Column B, resting the edge of the shoe on the work-
piece as shown.
2. With the blade just above the workpiece, pull the trigger. Using the
edge of the shoe as a pivot, lower the blade into the workpiece as
shown.
3. As the blade starts cutting, raise the handle of the tool slowly until
the shoe rests firmly on the workpiece. Then guide the tool along
your cutting line to acquire the desired cut.
NOTE: To make plunge cutting easier, use a heavy gauge blade.
A
B