


PAGE 8 — ESSICK FM9 — PARTS & OPERATION MANUAL — REV. #1 (03/12/01)
FM-9 — OPERATIONS
CLEANING OF MACHINE
At the end of the day, or when changing from one material to
another, the machine should be washed out. It is also suggested
that when pumping quick setting materials to wash out machine
and hoses approximately every 4 hours.
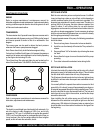
To clean the hopper and pump parts, run transmission in reverse
gear to relieve back pressure in hose, turn off engine, remove
spray gun and disconnect material hose. Remove pipe plug at
bottom of hopper, drain, and wash down the remaining material
with water. Replace plug.
After the material has been washed out of the hopper, the hose
can be cleaned by disconnecting the material hose from the
machine and removing the spray gun. Roll up a wet sponge and
place it into the material hose, reconnect the hose to pump fitting,
fill hopper half full with water and start machine.Pump enough
water through hose to push sponge through entire length of
hose. After sponge is pumped out, turn off engine and remove
drain plug from hopper to drain remaining water. Repeat the
sponge process if necessary.
Wash out spray gun, nozzle and orifices. Hose down screens
and the outside of the machine.
Note: When washing down the outside of the machine, be
sure the rubber boot is in place over the transmission lever pivot.
This prevents water from entering the transmission. Clean and
oil all threads and joints.
MIXING AND APPLYING VARIOUS MATERIAL
EXTERIOR DASH STUCCO
In areas where this type of finish is popular, a prepared machine
mix is available which requires only the addition of water.
however, some contractors prefer to mix their own material. The
following is considered a very satisfactory machine mix:
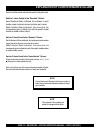
200 lbs. — Silica sand mo. 20
50 to 60 lbs. — Hydrated lime
100 lbs. — Plastic cement
2 to 3 lbs. — Zonolite finish aggregate
Color may be added as desired, but should be measured
for uniformity.
The above materials must be thoroughly mixed and of a thin
consistency, similar to a hand dash coat mix.
The surface to be sprayed should be thoroughly dry. Do not wet
before applying dash coat. Use either a 1/4" or 3/8" orifice. Be
sure a soft rubber stator tube is used, as soft rubber will resist
abrasives. After material is mixed, proceed as explained in the
operating instructions. Adjust volume at low speed and air
pressure to 20-25 lbs. If a second coat is to be applied, be sure
that the surface appears dry to the eye before application or it
will dry spotty and show a different shade of color.
SIMULATED ACOUSTIC CEILINGS
In many areas prepared materials are available for simulated
acoustic ceilings. In areas where prepared materials are not
available and where a contractor prefers to mix his own, the
following mix makes a satisfactory texture.
100 lbs. — Gypsum
6 cu. ft. — Vermiculite or perlite
Mix the above materials thoroughly so the aggregate does not
separate when in hopper. This mix should be of heavier
consistency than exterior dash, but still wet enough to pass
through a 3/8" screen.
If the material aggregate is made of vermiculite, use the hard
rubber stator. If the material is made of perlite, the soft rubber
stator should be installed. By using a 3/8" orifice and adjusting
the volume at second speed and the air pressure to 20-25 lbs. A
very satisfactory pattern can be obtained.
Since the finished appearance depends on the condition of the
original surface, it is suggested that any obvious defects, such
as ridges or holes, should be repaired with a hand trowel also,
the ceiling should BE scraped with a floor or wall scraper prior to
spraying the first coat.
Care should be taken when spraying the ceilings to fill the angles
well. This can be achieved by pointing the nozzle directly into
the angle, thereby spraying on the wall as well as on the ceiling.
The overspray on the wall can be quickly removed by using the
same scraper mentioned above.
You will find that a better job can be accomplished if two coats
are applied. But before applying the second coat, an inspection
of the surface should be made and any defects should be repaired
with a small trowel. After the inspection, the second coat can be
immediately applied.