


TP24X TILE SAW • OPERATION AND PARTS MANUAL — REV. #2 (04/12/12) — PAGE 21
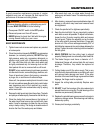
Performing Straight Cuts
1. Set the template base at the desired location on the
ruler guide and tighten the threaded knob. Make sure
the template base is firmly tightened to avoid slippage.
2. After the template base is positioned for the desired
cut, place the material being cut flat against the side
of the template base and the ruler guide.
3. Now you are ready to make your cut.
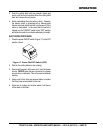
Performing Diagonal Cuts
The template base contains multiple templates for
performing diagonal cuts on a variety of common size tiles:
4" , 6", 8" and 10" (101.6, 152, 203 and 254 mm) or greater.
These are designed to secure the tile firmly in place during
the cut for improved accuracy.
1. Locate the template that is appropriate for the desired
tile size. With the selected template facing the vertical
channel in the cutting table, set the template base at the
desired location on the ruler guide. To cut the tile in two
equal halves, position the template base by aligning the
bottom edge of the selected template with the diagonal
table groove extending from the vertical slot of the ruler
guide. Tighten threaded knob once in place.
2. Place one corner of the material being cut into the
template and rest the adjacent corner against the ruler
guide. When cutting the tile in two equal halves, the latter
corner should rest within the vertical slot of the ruler guide.
3. Now you are ready to make your cut.
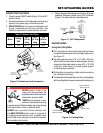
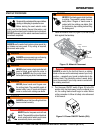
Performing Miter Cuts
To make miter cuts, an optional miter block must be purchased.
See Figure 13.
1. Place the lip of the miter block on the ruler guide with
the threaded knob facing you.
2. Position the miter block such that a tile laying flat
against the block may rest its left-most edge within
the vertical channel of the cutting table. Tighten the
threaded knob to secure the miter block in place.
3. Place material onto miter block and you are ready to cut.
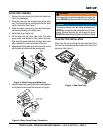
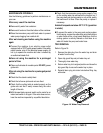
Figure 13. Optional Miter Block
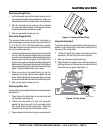
Using the Drip Guard
To minimize spillage, the saw features a side drip guard in
addition to the rear drip tray to help collect runoff from the
right side of the cutting table.
1. Lift the drip guard flap, located on the right side of the
saw frame, until the drip guard locks into place.
2. Now you may begin operating the saw.
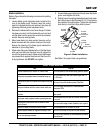
3. When the saw is no longer in use, unlock the drip guard
by lifting the base of the metal struts on either side and
then lower the drip guard. See Figure 14.
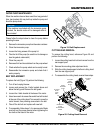
Figure 14. Drip Guard
METAL STRUTS
DRIP
GUARD
SAWING GUIDES