


ASSEMBLY
SWITCH
The switch is located on the front of the grinder near the bottom. To turn the tool ON depress
the rocker switch at the top near the word ON. To turn the tool OFF depress the bottom por-
tion of the rocker switch near the word OFF.
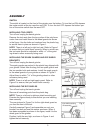
INSTALLING TOOL RESTS
Turn off and unplug the bench grinder.
Remove the tool rests from the top portion of the poly-foam
carton liner and install them to the wheel guards as shown
in the figure. Use the bolts and washers from the plastic bag
to secure them in place as shown in Figure 1.
NOTE: There is a left and a right tool rest. Refer to Figure 1
to ensure that you install them correctly. When in actual use,
the tool rests should be adjusted to within
1
/4" of the grind-
ing wheel or other accessory being used.
INSTALLING THE SPARK GUARDS AND EYE SHIELD
BRACKETS
Turn off and unplug the bench grinder.
The spark guards are packed in the plastic bag shipped with
your grinder. Select from the bag, the two spark guards and
the two smaller bolts and washers. Install the spark guards
to the wheel guards of your grinder as shown in Figure 2.
Adjust them to within
1
/16" of the grinding wheel or other
accessory being used.
NOTE: There is a left and right spark guard. Refer to
Figure 2 to ensure, that you install them correctly.
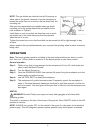
INSTALLING THE EYE SHIELDS
Turn off and unplug the bench grinder.
Remove all remaining parts from the plastic bag.
NOTE: There is a left and a right eye shield mounting rod.
Examine the figure closely to ensure that you are installing
them correctly.
The one pictured in Figure 3 is for the right wheel guard as
you face the front of the tool.
Carefully examine Figure 3 and assemble one rod, one
bracket, one bolt and one flat washer as shown. When it
has been assembled as shown in the figure, install it to the
wheel guard of the grinder
.
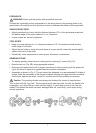
Position it with the arm high, as shown in Figure 4. and
tighten the bolt securely
.
5
Short
bolts
Washers
Right
tool rest
Fig. 1
Fig. 2
Washer
Bolt
Right
spark
guard
Fig. 3
Fig. 4
Bracket
Flat
washer
Long
bolt
Right
mounting
rod
Eye shield mounting
rod assembly