


6
NOTE: The eye shields are identical and will fit properly on
either side of the grinder. However it may be necessary to
loosen the center hex nut in order to slip the shield over the
mounting rod.
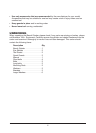
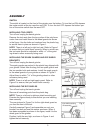
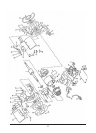
After you have assembled and installed each-eye shield
mounting rod to the grinder attach the eye shields to the
rods as shown in Figure 5.
Install them in such a way that the three hex nuts on each
eye shield are on the back side away from the operator
when the tool is in use.
Tighten the centra hex nut so that the shield can be moved but will be tight enough to stay
in place.
Always position the eye shields between your eyes and the grinding wheel or other accessory
being used.
OPERATION
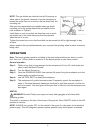
Note: The bench grinder needs to be bolted to the work surface before you start to use the
tool. Use ø
2
/5” (10mm) bolts or screws to fix the bench grinder on your work surface.
General operation
Step 1:
Obtain a tray that is large enough for the workpiece to fit into, fill it with water and
place it near the Bench Grinder.
Step 2: Turn the Bench Grinder on.
Step 3: Once the GRINDING WHEEL has reached full speed, bring the workpiece up to the
wheel gently and without jarring.
Step 4: Use the TOOL REST to steady the workpiece.
Step 5: The workpiece will quickly become heated. Frequently quench the workpiece in
water. If the metal becomes heated so much that it gets blue-colored, it will be too
soft to be useful. You must grind off the part that is colored, cool the workpiece and
start again.
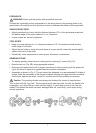
SWITCH
WARNING!
Be safe! Protect your eyes and wear safety goggles at all times while
operating grinder.
The switch is located on the front of the base of this grinder. Move ON/OFF switch to the ON
position to activate.
NOTE: ALWAYS turn grinder OFF via the switch in the event of a disruption in the electrical
power supply. This will safeguard operator against possible injury when power is restored.
Fig. 5
Back of
eye shield
Right
mounting
rod
Hex nut