


-
6
-
cordless tool or battery pack with this
charger.
13) Do not attempt to charge the battery
pack with any other charger.
14) Do not attempt to disassemble the
battery pack housing.
15) Do not store the tool and battery pack
in locations where the temperature
may reach or exceed 50°C (122
°F)
(such as a metal tool shed, or a car
in the summer), which can lead to
deterioration of the storage battery.
16) Do not charge battery pack when the
temperature is BELOW 0°C (32°F)
or ABOVE 40°C (104°F). This is very
important in order to maintain optimal
condition of the battery pack.
17) Do not incinerate the battery pack. It
can explode in a fire.
18) Avoid dangerous environment. Do not
use charger in damp or wet locations.
19) The charger is designed to operate on
standard household electrical power
only. Do not attempt to use it on any
other voltage!
20) Do not abuse cord. Never carry charger
by cord or yank it to disconnect from
outlet. Keep cord away from heat, oil
and sharp edges.
21) Charge the battery pack in a well ven-
tilated place, do not cover the charger
and battery pack with a cloth, etc., while
charging.
22) Use of an attachment not recommend-
ed may result in a risk of fire, electric
shock, or personal injury.
23) Do not short the battery pack. A battery
short can cause a large current flow,
over heating and create the risk of fire
or personal injury.
24) NOTE: If the supply cord of this ap-
pliance is damaged, it must only be re-
placed by a repair shop authorized by
the manufacturer, because special pur-
pose tools are required.
25)
TO REDUCE THE RISK OF ELECTRIC
SHOCK, THIS APPLIANCE HAS A
POLARIZED PLUG (ONE BLADE IS
WIDER THAN THE OTHER).
This plug will fit in a polarized outlet
only one way. If the plug does not fit
fully in the outlet, reverse the plug. If
it still does not fit, contact a qualified
electrician to install the proper outlet.
Do not change the plug in any way.
IV
. ASSEMBLY
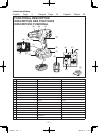
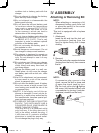
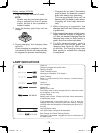
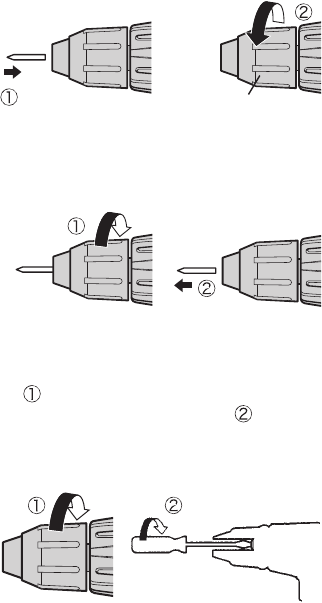
Attaching or Removing Bit
NOTE:
When attaching or removing a bit,
disconnect battery pack from tool
or place the switch in the center
position (switch lock).
This tool is equipped with a keyless
drill chuck.
1. Attachment
Insert the bit and turn the lock col
-
lar clockwise (looking from the
front) to tighten firmly until it stops
clicking.
Lock collar
2. Removal
Turn the lock collar counterclockwise
(looking from the front), then remove
the bit.
NOTE:
If excessive play occurs in the
chuck, secure the drill in place and
open the chuck jaws by turn-
ing the lock collar and tighten
the screw (left-handed screw) with
a screwdriver by turning it counter-
clockwise (viewed from the front).
EY7440(UL).indb 6 2006/09/13 9:39:45