


11
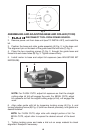
USING A LAMINATE TRIMMER
1. Material to be trimmed must overhang the base material by a least
1
/8".
2. Always wear ansi Z87.1 safety glasses while operating
a laminate trimmer.
3. DISCONNECT TOOL FROM POWER SOURCE.
4. Firmly grasp motor housing being sure switch is in the “OFF” position.
5. Verify bit is clear of foreign objects and cord will not “hang up” on any
obstructions.
6. Be sure workpiece is firmly held in place. Use clamps where necessary
to secure workpiece.
7. Plug in power supply cord. Be alert to resist starting torque of motor. Turn
motor “ON”.
8. Allow motor to reach “full speed”. Place base of trimmer on surface to
be trimmed and feed into work until bit pilot contacts base materials. When
guiding on a previously laminated surface, always wax or lubricate the area
that the trimmer will guide against.
9. Feed from left to right with smooth steady motion.
10. At completion of trimming operation, turn switch “OFF”. Allow motor to
come to a complete stop before laying trimmer down.
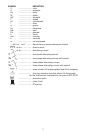
73100 EDGE GUIDE KIT
The Model 73100 Edge Guide Kit is available (as an accessory), for use with
the Model 310 trimmer. The 73100 is designed for use with non-piloted bits,
on curved or straight applications. Non-piloted bits can produce a 90°
straight cut, a 10° bevel cut, or a 22° bevel cut. The kit contains the parts
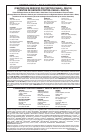
shown in Fig. 2. Install the 73100 guide as follows:
A – Base and roller guide - for use with non-piloted bits
B – Edge guide – for flush trimming
C – Edge guide – for bevel trimming
D – Straight edge guide – for straight trimming
E – Guide setting gauge
F – Mounting screws
G – Wrench
ABCD EFG
Fig. 2