


13
FLUSH TRIMMING
1. DISCONNECT TOOL FROM POWER SOURCE.
2. Attach base and guide to trimmer as outlined under ASSEMBLING AND
ADJUSTING BASE AND ROLLER.
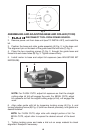
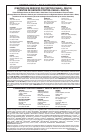
3. Remove roller guide and replace with flush trimming guide (B) Fig. 2.
This guide may be identified by the molded on letter “F”. The stud on the end
of this guide must face toward the trimmer base.
4. Install guide setting gauge (E) Fig. 2, into trimmer collet (see TO INSTALL
BIT). Install trimmer motor to base. Adjust guide so that hole in end of gauge
may be positioned over the guide stud.
5. Remove guide setting gauge from trimmer and install flush trimming bit.
6. Adjust depth of cut so that the straight portion of the bit extends below
the trimmer base at least the thickness of the material to be trimmed.
7. Make a trial cut on scrap material. Readjust if necessary.
BEVEL TRIMMING
1. Follow Steps 1 through 5 under FLUSH TRIMMING, except install bevel
trimming guide (C) Fig. 2. This guide is identified by the letter “B” molded
onto it.
2. Adjust depth of cut so that only the bevel portion of the bit extends
below trimmer base at least the thickness of the material to be trimmed.
3. Make a trial cut on scrap material to check alignment. Readjust if
necessary.
USING STRAIGHT EDGE GUIDE
The straight edge guide (D) Fig. 2, maybe used with either bit for trimming
straight edges.
Assemble it to the guide base and adjust similar to the other guides.
For assistance with your tool, visit our website at www.porter-cable.com for a
list of service centers or call the Porter-Cable help line at 1-800-487-8665.
TROUBLESHOOTING