


14
For assistance with your tool, visit our website at www.porter-cable.com for a
list of service centers or call the Porter-Cable help line at 1-800-487-8665.
TROUBLESHOOTING
MAINTENANCE
KEEP TOOL CLEAN
Periodically blow out all air passages with dry compressed air. All plastic parts
should be cleaned with a soft damp cloth. NEVER use solvents to clean plastic
parts. They could possibly dissolve or otherwise damage the material.
Wear ANSI Z87.1 safety glasses while using compressed air.
FAILURE TO START
Should your tool fail to start, check to make sure the prongs on the cord plug are
making good contact in the outlet. Also, check for blown fuses or open circuit
breakers in the line.
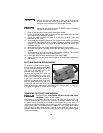
DRIVE PULLEY
The rubber-covered drive pulley at the rear of the machine is tapered from the
center to either side to make the abrasive belt run in line with the idler pulley at
the front of the machine. After considerable use, the crown of the pulley will wear
away and the belt will begin to run off the side of the pulley and cut into the
guide block or frame. When this happens, have the drive pulley replaced by your
Authorized Porter-Cable Service Station. Check the crown each time the
abrasive belt is replaced and tracked. After the belt is tracked to the front pulley,
watch it for a few seconds to see that it stays in place on the back pulley. Avoid
getting oil and grease on the rubber cover.
BELT GUIDE
The belt guide, or traction block, is made of hardened steel, and is located to the
left and to the rear of the idler pulley, fastened to the frame. This block protects
the frame of the machine. Always readjust the belt so it moves evenly across
(without rubbing) the guide block. This block can be turned over for further use
when it becomes worn and uneven. Once both sides are worn and uneven,
replace the block. Look for the correct part, specified in the parts list for your
sander.
LUBRICATION
Although all PORTER-CABLE tools have been thoroughly lubricated with a
sufficient amount of high grade lubricant at the time of manufacture, check the oil
level in the gear chamber prior to using your tool and periodically thereafter.
Use the following instructions for your specific tool.
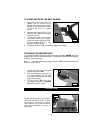
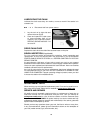
CHECKING THE OIL IN THE GEAR CHAMBER:
Disconnect tool from power source.
1. Place the sander on a level surface
2. Remove the oil plug from right side of the sander.
3. Ensure that the oil is level with the bottom of the hole.
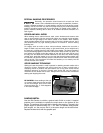
4. If oil is required, remove the oil fill plug from the rear of the housing (near the
trigger switch) and add a small amount of PORTER-CABLE SPECIAL OIL
#803442 (S.A.E. 90 Gear Oil).
5. Repeat steps two through five until the oil level is correct. Let any surplus oil
run out before replacing the plugs.